Saishū no Kabe
This article is a work in progress
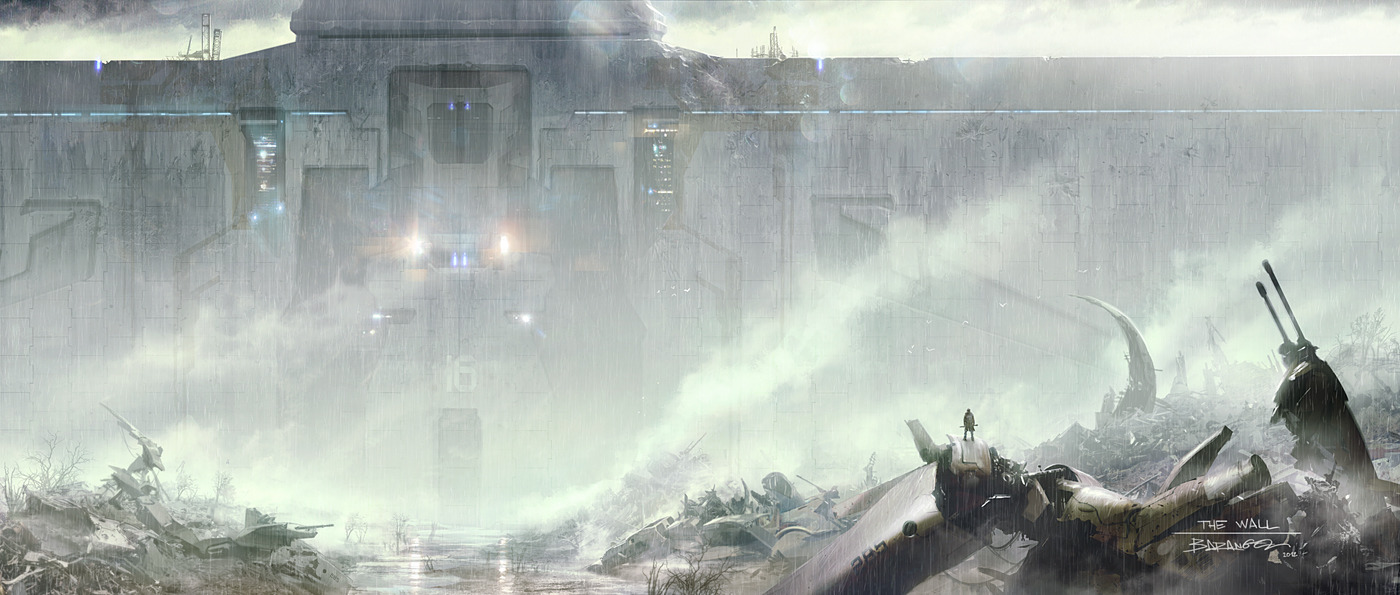
Saishū no Kabe - The final wall, surrounds the megacity of Kisara and is fitted with MLRS, auto-cannons, rotary cannons, automatic grenade launchers and a wide range of artillery and anti-air emplacements. The wall has successfully fought off every incursion against it so far.
The wall
From atop the gargantuan wall, heavily armed bastions can be seen nearby. Spattered amongst a disconnected spider web of roads and walls that connect the bastions to supply lines from the city, these bastions are the last guardians of Kisara city before the wall. The minor walls between the bastions surving only to slow the advancement of an enemy force and provide limited cover, they are not very large or thick but surve their purpose well enough. Further beyond the bastions, a long no man's land called the "Dead zone" streches out for several kilometers. Within the Dead zone are remenants of past walls and defenses, trenches, minefields, tank traps and barbed wire all now left to rust and crumble in the dusty wasteland. Within the wall, an industrial militarian force makes use of the hundreds of levels with warehouses, ammo depots, barracks, motor pools and engineering sectors. These facilities are mostly located to the rear-side of the wall keeping the front side structurally strong and laden with weaponry. Beneath the wall, a series of interconnected roads and embeded tracks deep underground transport people, machinery, ammunition and vehicles throughout the wall's many depots, storage facilities and barracks. A series of large freight elevators and cargo cranes facilitate the easy movement of cargo and vehicles between the wall's many levels. Directly behind the wall a series of external cargo elevator platforms and scafolding line it's exterior with conecting platforms at varying levels. Further behind these, ground-level facilites and checkpoints prevent civilians from getting too close to the wall. Additionally, the road entrances to the subteranean under-wall transportation network can also be found here.Gates
There are 4 main gates built into the ground beneath the wall that enter and exit at ground-level. These gates use a wide but relativley short tunnel and a system of air-lock style blast doors at both the entrance and exit of the tunnel.Apperance
These giant, thick, gates are a wonder in and of themselves. Able to withstand a direct nuclear blast and flanked by devastating auto-cannons, no force has been able to overcome them yet.Defences
Prior to the blast doors, on the gentle slope down into the tunnel at either end, remote controlled wedge-style barriers can be activated to stop incoming heavy vehicles as well as a series of pole bollards that can also be retracted into the ground to control the flow of or stop lighter vehicles. Due to the blast doors being recessed beneath the wall, an overhang is formed before the gate at either end. This overhang is used primarily to affix various sensors, lights and cameras but the main atraction here would be the two 30mm seven-barrel autocannons nested in the top right and left corners at both ends of the tunnel. These main gates are not connected to the rest of the walls facilities or transport networks, they simply serve as a pass through.Tunnels
Several underground railway tunnels also pass under the wall to allow for locamotive transport of cargo between the surrounding settlements. These tunnels are armed at consistent intervals with remotely activated shaped charges to most effectively cause a collapse. Additionally, throughout the tunnels, a series of blast doors automatically open infront of permitted locamotives and close imediatley behind them.All artwork that is not an original creation by myself (@Bladeswillfall) will be replaced in time with either original pieces or commissioned art.

Comments