Welcome to the World Anvil workflow for Game Masters!
Whether you’re new to GMing, or just new to World Anvil, this workflow is for you!
This workflow is ONE path to set up your campaign setting and game! Because World Anvil is a complete and flexible toolset, not all GMs will want to use every tool. It depends on your personal approach. Take it at your own pace, and only use what you need.
At some points, you can choose your path in the workflow, based on your account type (Freeman vs. Guild member) or your GMing style. You can also ask the community how they approach the process—after all, everyone is different!
Click the links below to jump to a specific part of this World Anvil workflow for GMs.
Contents
1. Set up your account
If you don’t already have an account:
- Navigate to worldanvil.com and click the Create your account button at the top right.
- Enter your email address, username, and password, then click Register.
- Complete the short account set up process!
Pro Tip: If you're a Game Master, enable both the worldbuilding and RPG features.
For more about set up options, check out:
How to create an account on World Anvil for GMs.
2. Create your campaign world
Now that you have an account, create your campaign world!
On World Anvil, a “world” is your campaign setting. It could be anything from a single city (like Neverwinter), to a continent (like Faerûn), to a galaxy far, far away (like Star Wars), or even a whole multiverse (like the Marvel multiverse). As long as it works as a single setting for your stories, it’s a world!
Pro Tip: If you’re running games and writing stories/novels in the same world setting, make it one world on World Anvil!
Why create a world first?
You’ll need to create a world to access the campaign manager. As a GM, you’re constantly worldbuilding as you create people, places, and things—and an immersive player experience! In your world, you can record all that information so it’s easily searchable and won’t get lost.
Steps to create a world:
- Click on the world switcher in the top bar (if you already have a world, it will display its name).
- In the "Worlds" tab, find the "New World " button and click it.
Pro Tip: Select the RPG system for your campaign while you’re creating the world! This gives you access to that system’s stat block templates (if supported).
Need more help? Check out this tutorial:
How to create a world on World Anvil.
3. Fill out the meta section
Now you have a world, so it’s time to start worldbuilding with the Worldbuilding Meta Section!
On World Anvil, “worldbuilding meta” is your setting’s basic information—like its DNA. This is a place to record the behind-the-scenes stuff your players might never know (or might learn much later), like themes, core conflict, and inspiration.
Why create a Worldbuilding Meta?
The Worldbuilding Meta forms a solid base for your worldbuilding. If you get stuck preparing your next game, visit it to renew your inspiration and motivation!
If you’re building a new campaign setting:
Fill in the meta to start your campaign setting on a strong foundation! Establishing these big ideas will help you define what’s unique and compelling about your new campaign setting.
If you already have your own campaign setting:
Use the meta to refine your concept more clearly! It’s a great diagnostic tool to help you articulate your vision. It can also inspire you to fill in areas you hadn’t thought of before!
If you’re using a published Campaign Setting:
Many published campaign settings are HUGE - with many themes, areas and options! Use the meta to help you focus. Hack-and-slash to espionage & intrigue, what kind of game do you want to run?
To create your world meta:
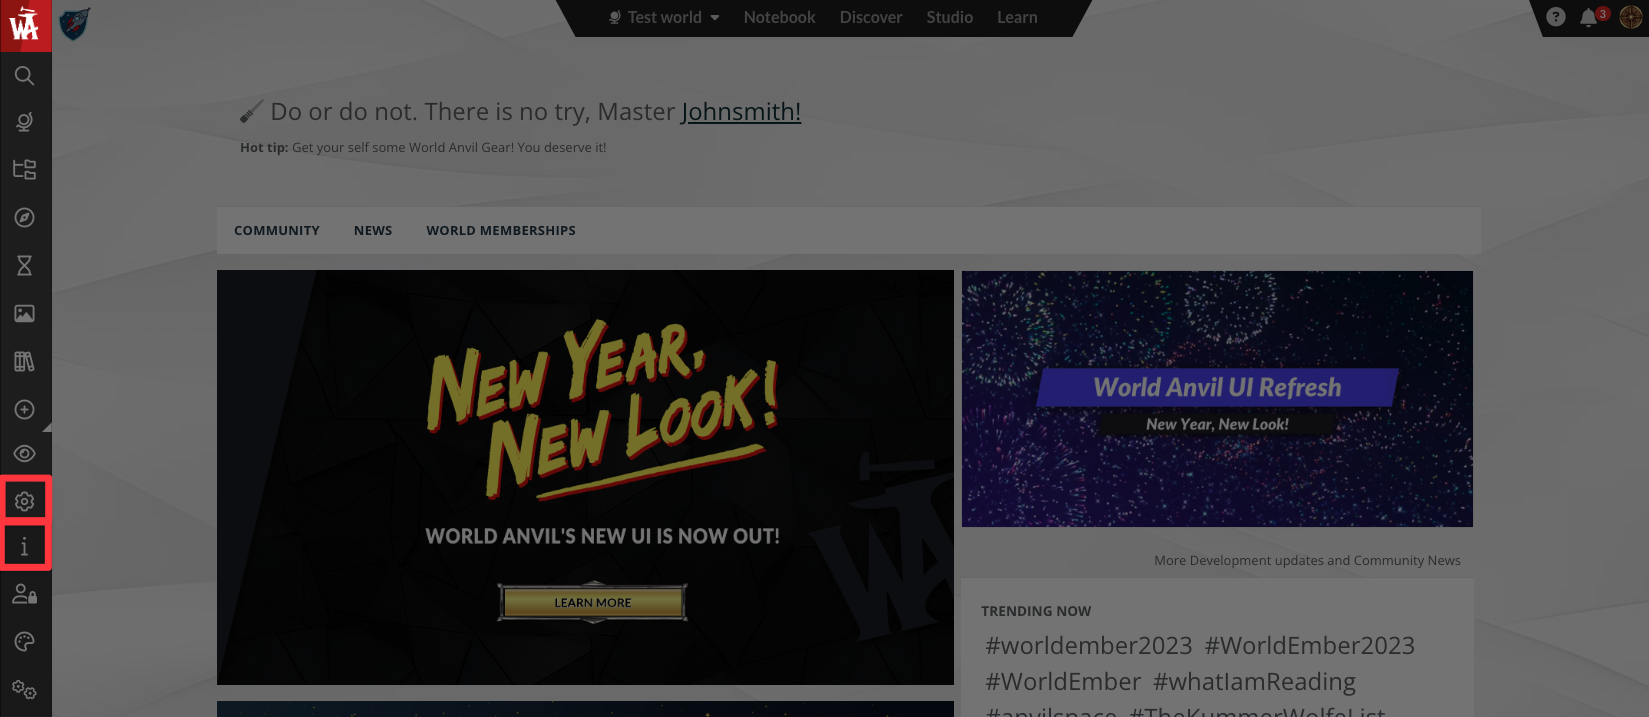
- Click the gear icon at the bottom of the sidebar, and then the icon, as shown below.
- Fill in the tabs and answer the questions, and remember to click save when you’re done.
- Write in short sentences and bullet points (believe me on this one—it’ll be so much quicker to reference later!).
Want more help? Then check out these resources:
How to fill in the Worldbuilding Meta on World Anvil
Melior’s meta document (by TJ Trewin), a great community example!
4. Build the basics of your campaign setting
Now you have the big concept of your setting, you’re ready to start creating your articles!
Articles are the core of your campaign setting on World Anvil. Think of them as Wikipedia entries. They have structured information about a specific topic. They can be as short or long as you want, and they’re linked to other related articles. World Anvil is specialized for worldbuilding, and so are articles! Different templates include special features like dictionaries (language template), family trees (character template) and diplomacy webs (organization template).
Depending on the nature of your setting you’ll need to approach articles in a different way:
Creating your own (homebrew) setting:
Start your articles from scratch and write as much (or as little) as you want!
Follow the steps below to create them!
Using a published* setting:
Create articles for any content that you add to the setting, or for anything that you change. You can also create summaries for quick reference.
To create a new article:
- Navigate to your world’s Dashboard (click the link on the left sidebar). You’ll see a grid of different article templates.
- Choose the article template that best fits your idea.
- Add a title, then start writing in the article introduction box!
- If you need some inspiration, open the optional prompts using the button at the bottom of the page to see a list of things you can write about.
Need more help?
Learn more about editing articles from these resources:
How to use the Quick Buttons to create articles on the fly
How to link articles with the mention system]
How to customize your article's layout
Guide: World Anvil Article Editing Interface
What articles do I need to create for my RPG campaign?
This is very individual, but here’s a method we recommend:
- Re-read through your Meta from the previous step
- List the major people, places, things, and concepts in an Article (general article template), the Notebook, or the ToDo list.
- Expand each concept into a brief Article (even just a few sentences) using the worldbuilding templates.
- Link them together where you can.
Once you’ve created these, start thinking from your players’ perspective! What will they interact with, and in what order?
Bonus Action: Bringing in your players
Once you’ve built the basics, chat with your players. Their characters might influence your campaign’s details. Their backgrounds, motivations and origins can enhance worldbuilding and storytelling. Include them in the process! This can be a casual chat or a session zero. Give them our Players Guide to World Anvil, so they can add their characters to your world!
Once you’re a bit clearer on your campaign setting, it’s time to figure out how much worldbuilding you need to start your campaign.
That might mean creating elements for character backstories, major cities your party will visit (Settlement template) or cultures (Culture/Ethnicity) they’ll encounter, or even monsters (Species) and evil cults (Organization) they’ll fight!
You’ll probably be creating two kinds of articles:
Notes for-your-eyes-only:
Just for your personal reference. Write your articles in bullet-point lists that get straight to the point. This makes it easy to reference important information while running the game.
Creating player resources
For articles for your players, layout, readability, and good prose are more important. Good quality handouts increase player immersion. They’re worth some extra time and effort!
In both cases, start with just the basic information and don’t succumb to Worldbuilders Disease. You can always add more details as your campaign progresses!
Pro Tip: A hidden section summarizing the most important information in an articlewill save you valuable time during a game! The Storyteller’s seeds box is a good place to put that info!
5. Organize your worldbuilding with categories
Now you’ve created some articles, it’s time to organize them! You can do this with categories.
A category is like a folder that contains articles. Use them to group articles by topic. You can also nest categories to create a tree-like structure for your campaign setting.
To create a category:
- Click the Articles link on the left sidebar.
- The category tree is on the left of that interface (in red below). To create a new Category, enter the name in the text box below, then click the Add button.
- Drag and drop articles from the central column into the categories on the left.
Looking for more? Check out our resources on category trees for more advice:
Other worldbuilding tools (optional!)
At this point in the workflow, you should have a good handle on your campaign setting. Congratulations! You’re almost ready to start session 1!
If you want to flesh out your setting more, these tools might be helpful!
- Interactive Maps: upload your map and make it interactive, with pins, zoom, and other tools. Give your players a quick impression of their starting area at a glance! Track the party’s progress, and even pin your session reports to the map!
- Timelines: useful for decoding and helping players understand relevant events in your world, past and present.
- Visual themes (Guild-only): give your players the look and feel of your world with visual themes! We have dozens to choose from, and you can even make your own.
- Chronicles (Guild-only): powered-up timelines! Chronicles merge maps and timelines into a single tool, so you can see when and where everything happened! It’s a must if you have complex lore, or you’re tracking multiple parties or villain movements.
- Family trees (Guild-only): display an interactive family tree of your characters. Really helpful for political intrigue, family drama, and tracking royal or magical lines!
Quick recap!
By now, your world should now have:
- A meta document to keep a solid foundation for your project.
- Some articles with information about your world.
- A basic category tree to organize your worldbuilding.
- Maybe a map, timeline or other visual aid for your players!
Now that your campaign setting is ready, it’s time to start preparing and running your game!
6. Create your campaign
Now create a campaign in World Anvil’s campaign manager!
The campaign manager is a set of specialized features for GMs. It includes party management tools, session scheduling, a character manager, a virtual GM screen, and more!
To create a campaign:
- Click the world switcher in the top menu bar.
- Click the “Campaigns” tab.
- Click the “New Campaign ” button. During the creation process, make sure to select the proper system for your game!
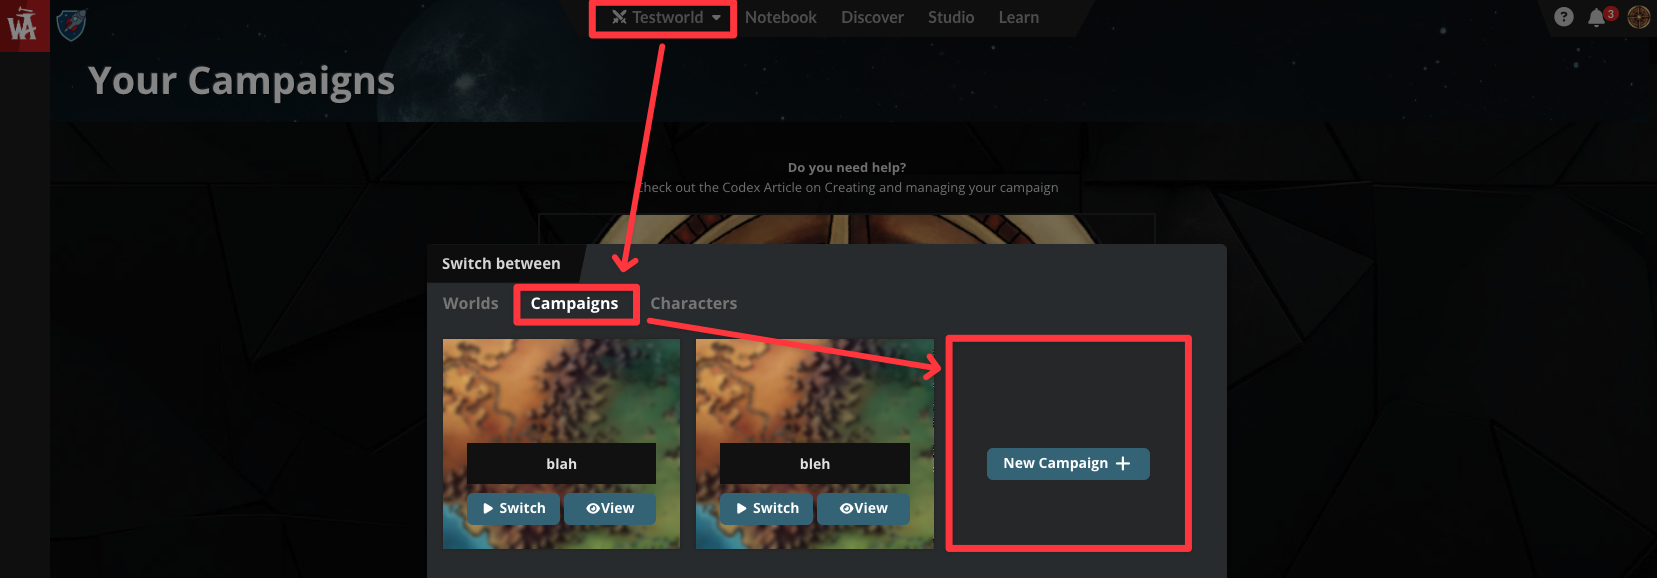
From now on, you’ll be able to access the campaign manager using the “ Campaign” option in the left sidebar.
7. Invite your players
If you’re using a VTT with integrated character sheets, or your players prefer printed character sheets, skip to the next step.
Players can manage their characters, equipment, see handouts, and more in World Anvil! They can also explore and interact with your world—at least, the bits you choose to share.
Invite your players to your World Anvil campaign:
- Send players the World Anvil Player Guide, which walks them through creating a free account and a player character.
- In the campaign manager, go to the “Protagonists (PCs)” tab. Add their email addresses in the text box!
You can also copy the invite link and share it if they don’t use email. - Once your players follow the link, they’ll be able to choose one of their characters and join your campaign!
9. Plan your game
Planning your RPG Campaign and your Sessions
Each GM plans their sessions differently, but here are two tools on World Anvil designed to help!
Are you a written planner?
Use the Plot template to outline your Master Plan! This article template includes prompts and sections to help you plan your campaign and session structure!
Are you a visual planner?
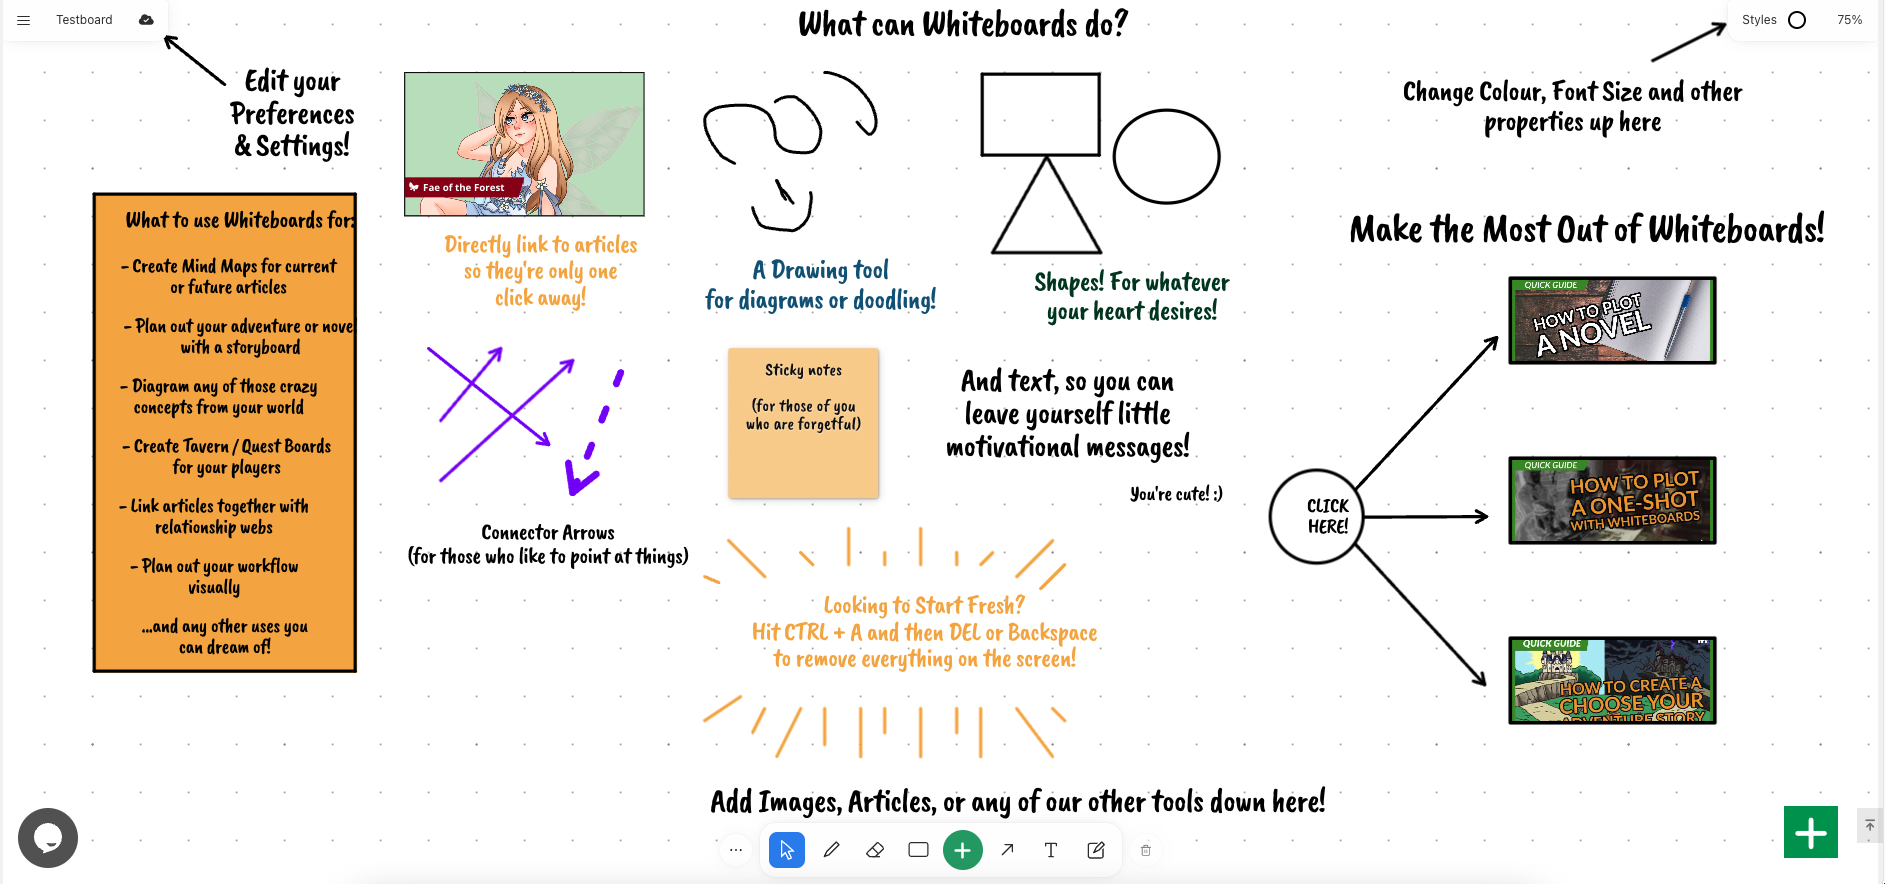
Prefer to sketch it out? Whiteboards are a blank canvas you can use to create anything, including the structure of a campaign or RPG session! Draw connections, show forking narrative paths, or if/then flowcharts.
Using the Plot Template
If you’re preparing a campaign:
- Open a plot article and start with top level info: a short bullet-point list including:
- What sort of adventure is it?
- Who are the antagonists?
- What’s the party’s role in the plot?
- Next, create an additional Plot article for the first session or adventure arc.
Now, in your first session/adventure article, open the optional prompts at the bottom, then use the Parent Plot drop-down to select the Master Plot article.
As your campaign progresses and you plan more session or adventure arcs, create them in the same way, linking your Master Plot as the parent!
Important: choose your parent plot carefully! If you accidentally create a logic loop, you will break space and time (and also World Anvil). Don't choose a child plot as a parent plot.
Using the Whiteboard
Follow these steps:
- On the left sidebar, expand Advanced Tools and open Whiteboards (Guild Only).
- Create a new Whiteboard and give it your campaign’s title (you can change it later).
- Use the drawing tools at the bottom of the screen to create the general outline of your campaign.
You can also use Whiteboards to have a visual representation of the different factions and characters of your setting. Make sure to create a new whiteboard for each adventure arc too—having everything in a single whiteboard may get confusing!
Bonus: Create a world primer
Some players will want to know more about your campaign setting before session 1. They might even need that information to complete their characters!
You can give them a brief overview of what’s going on in the Primer tab of your Campaign Manager. Keep it short—only the most critical information—so you don’t overload them!
- Open your Campaign Manager and click on the “Primer” tab.
- In the “World Articles” panel, choose the articles you want your players to read. They should be general high-level articles rather than minute details. Don’t see your articles there? Make sure they are published!
- Click the green plus button next to each article you want to add. Your players will see the primer on their side of the campaign manager.
Pro Tip: If your players are not using the campaign manager, create an introduction to the world as a generic article and share that one with your players.
Create your stat blocks
If your RPG system uses stat blocks to represent NPC and monster abilities, you’ll want to prepare those before session 1! Either create your own or pull from our community stat block library.
- On the left sidebar, open Advanced Tools and select Stat blocks.
- On the right, select the kind of block you want to create and click “Create a new sheet”.
- Fill in the fields as required for your system and click “Save changes” when you’re done.
Schedule your sessions
The final step is to schedule your first session!
To schedule your first session:
- In the Campaign Manager, click the “Sessions” tab.
- Click the “Schedule a new session” button on the right.
- Fill in the details and click “Schedule Session”.
10. Run your session with World Anvil
If you aren’t using the campaign manager, skip this step.
Whether you’re playing around a table, online or through a VTT, World Anvil lets you access your campaign and setting notes in seconds.
Playing in Person or “Theatre of the Mind”
When you’re ready, click the Open your Storyteller’s screen button that appears at the top right of the campaign manager.
This will open your Digital StoryTeller Screen (DSTS), a personalized portal where you can access your whole setting, campaign notes, and character sheets.
If your players are using World Anvil for their characters, you can see their sheets, send them handouts, share articles with them and more. They can also make session notes you can see later!
Using a Virtual Tabletop (VTT)
VTTs can be great, but they’re no substitute for a proper campaign manager! If you’re using a VTT, World Anvil will serve as your GMs notebooks and quick reference!
- Use the world Dashboard to quickly search your articles to reference your setting information while you’re running the game.
- Have another tab open with the Statblocks page. Quickly find what you need with the search bar.
- Have a third tab with the session plan so you don’t lose it during the session.
11. Create a session report
Session reports are a great way to make sure everyone is on the same page about what happened in a past session.
To create one:
- Go to the Campaign Manager’s Sessions tab.
- If the session is still active, end it. Then, click the “Write Report” button on the session’s panel.
- Write what happened during the session. Then, share it with your players.
If you aren’t using the campaign manager, you can create session reports from the world Dashboard, using the session report template.
12. Rinse and repeat!
After a good night’s sleep (you deserve it after your hard work!), it’s time to go back to step 9 and prepare for your next session!

