The article editing interface is the tool you use every time you want to edit a new or existing article. Its key feature is the text boxes where you type the contents of the article—but there are many other options designed to customize your articles to your heart's content. This page will guide you through the different steps of the article editing process so you can use the tools to your advantage. As always, remember that you don't need to follow this guide, but it will give you a solid starting point.
Check How to create an article if you don't know how to do it.
Contents
Article editing
When you create or open an article for editing, you'll see the main text box at the top of the page with a button underneath that says "Show Template-Specific Prompts & Connections". You can write the entire article in that text box, but you can also click the button to see prompts related to the article's topic and use them for inspiration. For example, Character articles have prompts like "Education" and "Physical Condition". These prompts are completely optional, but they can be useful to expand your worldbuilding if you're stuck.
All articles need a title! If you're creating an article, give it a title at the very top before doing anything else. If you don't know what to name it, use a placeholder name.
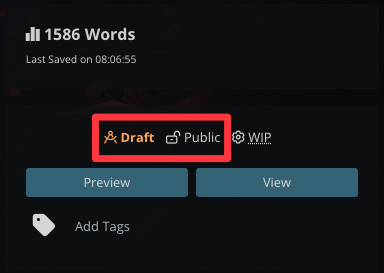
Once your article is written, just click the "Draft" toggle at the top right, and you're done! If you're a Guild member, you can also toggle its visibility between Public and Private there:
Creating and editing articles is as easy as that. The rest of this guide deals with additional options to better organize your content, improve the article's layout, and more.
Quick preview
Available to all Guild subscription tiers. Upgrade here.
The quick preview lets you quickly see the result of what you're writing in the article. To see it, just click the "Preview" button on the right. Click it again to continue editing.
The quick preview has a different appearance than the article in view mode. While it keeps the basic formatting and layout, it will not display any embedded content (such as maps or family trees) nor your theme/custom CSS (if any). It's designed for quick reference only; use the View button if you need to check what the article actually looks like!
Article layout options
If you want to make use of special sections like the sidebar or the article subheading, click on the "Sections" tab at the top of the interface. That section is organized in three sub-tabs:
- Sidebar sections: there are several text boxes to control what appears on the right sidebar, as well as a toggle to disable it.
- Footer sections: it includes free-form fields, but also relation options (for example, to link an image gallery to the article), as well as options for the comments box.
- Header sections: this is where you can write the subheading and the credits of the article. They will be displayed under the article title, before anything else.
Design options
While layout is usually about where things appear, design is about how they look. Free accounts have the Basic sub-tab available, which lets you set a cover image for the article, a short excerpt that will be used in lists and embeds, and an article icon.
Guild members have additional options, such as CSS customization and, for Grandmasters and above, SEO-related options.
For a better article design, make sure the sidebar has enough content—otherwise it will look empty. Images look great there, as well as quick facts, trivia, and other short snippets of information.
Organizing your content
Organizing your articles is as important as writing them—as your world gets bigger, finding old articles will become increasingly difficult if you haven't properly organized them. There are three main organizational elements you can apply to articles:
- Categories: you can think of categories as "folders" you put articles into. An article can only be in a single category, but categories can be inside other categories. You can control them from the "Navigation" tab.
- Parent articles: when an article describes something very specific about a topic, you can instead set a parent article. For example, an article about a room could have the building it's part of as its parent article. You can set it from the "Navigation" tab too.
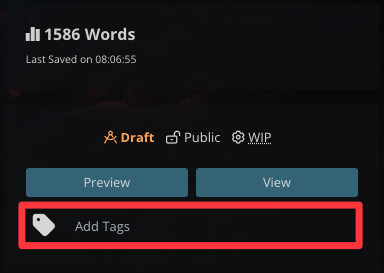
- Tags: think of them as color-coded sticky notes you can put on your article. An article can have as many tags as you want, but they're not designed to be the primary organization system. You can set them from the right sidebar, under the "Tags" section:
Categories and parent articles will create a tree-like structure in your world homepage for easier navigation.
You can look for all articles with a specific tag by typing that tag in the search box of your world.
Article-specific settings and deletion
The Preferences tab contains multiple settings that will apply to the individual article. They include the NSFW toggle, an option to disable comments, and more.
To delete an article, you can use the Preferences tab too. Check out How to delete an article for more details. Note that deleting an article is irreversible! Deleted content can't be recovered.
Private content
Available to all Guild subscription tiers. Upgrade here.
If you're a Guild member, you have access to various options to make your content completely or partially private. Here's a quick run-down of article-related options:
- Article privacy toggle: at the top right of the editing interface, you'll see a toggle to switch between Private and Public. Simply click it to set its visibility status.
- Subscribers: you can also add subscribers to the article to make it public to them but not to anyone else—add them by clicking the plus button under the privacy toggle. Check the Guide to subscribers for more details on how to set up subscriber groups!
- Secrets: from the "Secrets" tab in the article editor, you can add and manage secrets. Secrets will stay private even if the rest of the article is public. Learn more in the Guide to secrets.
- Hide from table of contents: if you want your article to be public but not accessible from the world's table of contents, go to the "Preferences" tab and uncheck the "Show in Table of Contents" box.
Advanced options
The editing interface has some advanced options hidden under the "Open Advanced Tools & Options" link on the right. It includes a tool to check which pages link to the article, options to move the article to a different world, an export button, and more. Here's a quick overview:
- Notification buttons: Use the different buttons to notify your world follows in different ways: add the article to the world homepage, send them a notification, or send a notification on your Discord server.
- Master Referenced in...: Use this panel to get a list of all articles that contain links to the article you're currently editing.
- To-do list: view and manage your to-do list.
- Special actions: this panel includes options to apply a custom template (Grandmaster subscription only), set a different author (useful in world with co-authors), move it to a different world, and export it as a simple HTML page.
- Metadata: this panel includes various useful pieces of information about the article, such as wordcount and creation date. You can also copy the articleblock embed code from here.
