Morta Dungeon
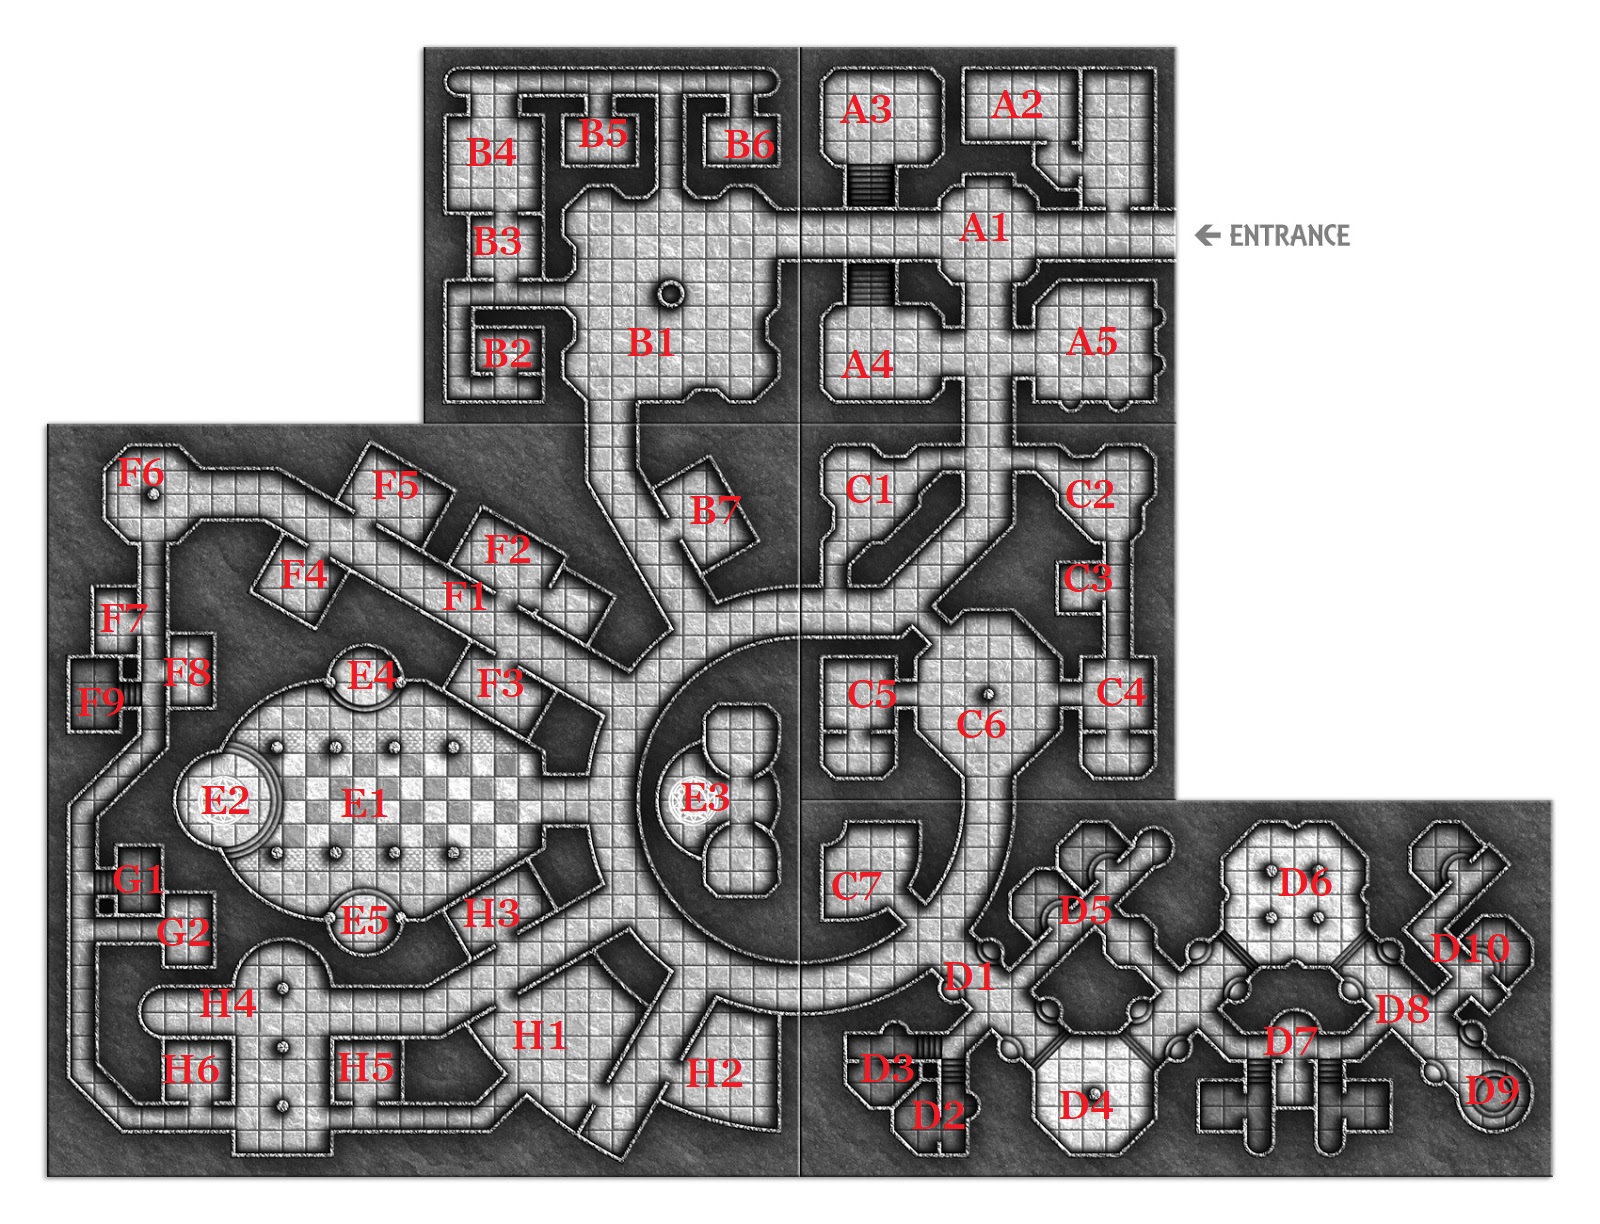
Deep below the Morta Mountain, Morta dungeon is home to multiple monstrosities, and mystical knowledge. One of the stronger creatures here is the Spectator, created from a Beholder Adventurer when he was hiding his riches inside of the dungeon. The dungeon has 4 layers, the first one being filled with carvings from long forgotten Military group , the second being home to a Drider who commands an army of spiders, thirdly being home to a forest of mushrooms, a large amount of followers of Zuggtomy reside here. Finally, is a safehouse of frightened monsters from humanoids, and adventurers, such as Kobolds, Oozes, Ogres, Spectators and even a Wyvern. The first layer is designed for Level 2 adventurers, whilst the 2nd is for 4th levels. The same goes for the Third Layer and then 5th Level for the final layer.
There are many traps hidden on this dungeon, most being on the first floor as there are no creatures residing here to anyone's knowledge. The traps are;
- A set of 2 walls that lock people in a trap that slowly fills with water for 2 minutes, drowning any small creatures
- A large spiked pit with a hanging piece of rope, but when a creature weighing more than 190lbs swings across, the rope extends and instead of swinging to the other it, it'd swing into the wall below it.
- A cage that drops onto anyone who stands on a pressure plate, which has barbed wire wrapped around it.
As well as many more. The first floor also has a few constructs roaming around, however there is said to be a Minotaur that destroyed them long ago, and enjoys testing out new traps, such as spiked floors, acidic pits, or even reanimated monsters.
The second floor has been coated by webs, and is a resort for Phase Spiders, where a Drider keeps them safe. Unlike most Drow turned Drider, this one chose to become more Spider-Like. She has began to work on creating more space for her spider-kin, and with it comes some Dust Mephits.
The third floor is filled with a large amount of mushrooms, and is home to Fungi, Myconids and even demons. They are all followers of a Demon Lord called Zuggtomy, and she has power over most fungi. There is a large prison where creatures have been held and are being turned into fungal servants.
The final layer is the most dangerous, as all of the monsters there are aligned in a group. They all care for one another, and their leader is a Gauth, who is currently training a Wyvern with their ally, a Tlincalli Mercenary. They don't do much more than live in solitude, but they are known to make up stories.
Extended Info
A1 - A circular room with walls that rise once a pressure plate is triggered, until water would flood the room for 3 minutes, before sinking into holes in the ground. The walls stay open however, and need to be picked by something small and thin, such as thieves tools or a dagger, to open 3 of the 4 walls, the one not open being the entrance/exit.
A2 - A small stable with a camouflaged area that brought in sunlight. 2 Warhorse Skeletons are sitting idle in the corner, surrounded by withering hay. They usually don't do too much, but at night, they may step outside of the Dungeon to investigate the local areas. There is also a pantry-like area with small loaves of bread in some sort of cabinet unaffected by the withering effects surrounding the bread and the cabinet.
A3 - A small flight of stairs leading up for 12 Feet that holds a small chest with personal belongings and Trinkets. It appears to be gathering dust and is surrounded by sticks. It connects to A4.
A4 - A locker room of sorts, with simple daggers and javelins in each compartment. Each of the 6 lockers are labelled with names covered in dust. They appear to be names written in Elvish Script. Also there is a broken sign on the ground with claw marks across it. Upon a DC 10 Perception Check, it displays the writing in Elvish; 'Personal Items'
A5 - Inside of here appears to be A Zombie in a security uniform, sleeping on a small bed. It appears to be a night watch move, and a poster torn to shreds lays on the ground. There is also a timetable carved onto the wall, displaying that there was 6 hour shifts for the security of the entrance of Morta Dungeon. There is also a switch that manually triggers the Trap in A1.
B1 - A large fountain with chairs across the walls. There are 4 Cultists here, and try to bargain with any intruders to join their pact with a low level Yugoloth.
B2 - A small ice room to keep cold things needed to be frozen. An Ice Mephit resides in on a chest at all times. There is also a frozen line of pigs along the wall.
B3 - A small waiting room with a small card table to play board games. It has a lane of stools and a small but tall drinks stand. It appears to be stained with blood. The stools are likely to break when a medium or larger creature chooses to sit on one.
B4 - The dining room has 4 Zombies, 1 Death Dog + 1 Noble sitting around the table, and the dining table is filled with torn up corpses. There also appear to be flags of the old Raman Crest. There is also a small Mimic disguised as a chair at the end of the table. There are 2 gems on top of each of the chairs, each being made of a common Emerald and worth 50 GP each. There are 10 chairs in total.
B5 - An empty kitchen with rotting food lying around. The potatoes and other vegetables seemed to have mutated and infected the old cook, making them a battery of energy to make a sentient potato.
B6 - B6 is a pantry with non perishable foods. They can keep up to 20 people alive for 5 weeks. There is a Giant Rat however, which roams for food to eat.
B7 - A cremation room with a furnace used to cremate dead bodies. The furnace however has been out of use for many years though, and a Spectator sits where the ashes would be kept, and ponders that if she could, if she would burn all of the zombies to set their souls free. Her name was Camilla, and can be returned to life if she is given a Gem worth 100 GP, which she can bargain with some higher power to re-join the living.
C1 - A well laid out combat mattress lays in the centre of the room. There appears to be sandbags, gloves, and other combat-related Sport Equipment.
C2 - A combat range with dummies and targets on one end of the room. The other side is blocked off with a jammed door. It takes a DC 15 Strength Check to break down the door, or a DC 10 Sleight of Hand Check to pick the lock.
C3 - This room appears to be a closet of crates. There are 5 different crates with different colours. The red crate is filled with daggers, the Yellow with Maces, the Blue with spears, the orange with Sickles and the basic one holding Hand axes.
C4 - A small forge. It is still active and has a pile of ingots next to it, recently forged by an Ogre, who would be sleeping in the corner of the room against the wall. There is also a barrel filled with fine ores worth around 500 GP in total that the Ogre is sitting sleeping on.
C5 - A small hospital like area with medication lining the wall. There is also a bookshelf on medicine and magical healing. The medication heals 1d6 HP per day for 10 days.
C6 - A communal area with a small circle sofa around a small statue of a skull. The skull can break off if all the seats are filled and summons a Gargoyle.
C7 - This room is filled with fake gems which has been laced with a Burning Hand spell, and will be triggered if touched. A DC 10 Perception/Arcana Check can show that they are indeed fake. The spell has 3 charges on it, and once these charges have been used, the fake Gems will turn to Ash.
D1 - A hallway with 4 curved sofas in the corners, made of a strong wood and fabric. They all have small books of information on Raman scattered around them.
D2 - A small basement of Documents on the lower layers of the Dungeon.
D3 - Another basement of Documents on People in Raman and neighbouring locations. A corpse is on the ground, and is on constant guard by the Corpse's pet, a Dire Wolf.
D4 - Across this room is the Bestiary section of the library, and there's a drinking fountain stained with blood as hung corpses hang from the roof.
D5 - 2 Studies, each with pinned corpses of Scholars by Horns. 2 Imps are in both rooms, tearing up all of the books they could find.
D6 - The 4 pillars in this room each hold a scripture from some old philosophers on War, Peace, Time, and Purpose.
D7 - The 2 basements here hold poisoned walls, which deal 3d4 Poison Damage upon touching. There are a few danger signs made from flesh on the wall, and a corpse appears to have been covered in lumps in the corner.
D8 - This Hallway holds no interest, and solely connects to other rooms.
D9 - This Dead End has 8 Flying Snakes circling a collection of dead pets and mounts. There is a gleaming script in the centre, holding vital information on how to leave the Dungeon.
D10 - A small, broken Elevator seems to be built here, it only seems to go up, but the entire elevator shaft appeared to collapse at the top.
E1 - A Large, communal dining room with it's tables by the walls, which shows runes on the carpet. 2 zombies can be seen eating on another, waiting for fresh meat.
E2 - A ritual circle on the ground is guarded by a Knight which is undead, who easily gets distracted by uses of Mage Hand. The ritual markings allow whoever stands on it to teleport to an identical ritual on E3.
E3 - A functional elevator room, guarded by a Minotaur. The Minotaur has also a Thorn Whip and has a spell scroll to cast Cloud of Daggers from a fallen Wizard. The Elevator goes down to the 2nd layer of Morta Dungeon.
E4/E5 - Both E4 and E5 are sending Stone booths to talk from one side of the room to the other, to act as a confession booth to one another for the old residents of this base.
F1 - F1 is the hallway to the dormitories of the old residents. They are all marked by an older form of Common. Each of the Rooms also have a certain weapon engraved on each Door. They include; A Halberd, A Longsword,
Excalibur of the One King , and a Morningstar.
F2 - F2 belonged to the defenders of the group. Whenever they were getting looted or attacked, they would be focused on defending. The walls are aligned different Shields from different nations around Aitso.
F3 - F3 belongs to the hunters and sources of the group. They are filled with holy books, different arrows and sword sheaths, and a scripture on sorting Library Books with the other side being for sorting cooking ingredients.
F4 - This room appears to belong to only one person, a member of minor Royalty in
The Hallandary The Bed post seems to the initials of C.R, with a gemstone marking next to it. With a DC 15 Perception check if they haven't found the Spectator, or a DC 5 Insight check if they have, they are able to find out it is Camilla's room.
F5 - A bedroom which has many holes in it's walls and floor. A Morningstar can be seen bludgeoned into a wall, with it's spikes broken off. The bed is ripped in half and underneath is a corpse.
F6 - A corner plaza where a blood sacrifice in the centre of the room can offer an amulet which can have the effects of a healing potion, which can only be used once per short rest.


Comments