Interactive maps are the perfect way to visually keep track of your worldbuilding.
You can create different types of interactive pins (like text labels, lines and polygons), and even pins your players can drag around. Those pins can link to your articles, or even to other maps!
Interactive maps are also a powerful way for your players and readers to explore your world interactively.
Interactive maps don't have to be maps! You can upload any image you like and make it interactive; like a collection of character portraits with pins to their characters, magic item art with links to their articles & stat blocks, or a collection of animals with pins linking to their species.
Pro-tip: don't have time to make your own map image by hand? Click here for our mapmaking resources!
Contents
How many maps can I have?
As many as you want! However, Freeman maps can't be larger than 3.5 MB in size. Guild members can use 25 MB per map. Additionally, Freemen can have up to 2 layers in there account (there is no limit for Guild members).
How big can my maps be?
There are no hard limits when it comes to map resolution/pixel count. However, as maps are rendered on your browser, large images can slow down or even crash your computer. Even if you have a powerful machine, consider that your readers might have less powerful computers. It's recommended to keep them as small as possible and under 6000 px.
Can I change my map's base image?
Yes! Follow these steps:
- Go to map settings
- On the right, find the "Update map primary image" panel.
- Use it to upload a new base image.
The expected image size will appear in the panel. If the new image has a different size, markers will not be repositioned so you will need to re-adjust them.
1. Create your map
World Anvil is not a mapmaking software! In order to use the interactive maps feature, you need a map already created and saved as an image on your computer.
To create a map:
- Click on Maps in the sidebar.
- Click the Map button.
- Give the map a title and upload an image from your computer.
- Click the submit button or Shift + Enter.
After creating it, you'll be redirected to the timeline interface.
2. Quick overview of the map interface
Here's a very quick overview of the map editor interface:
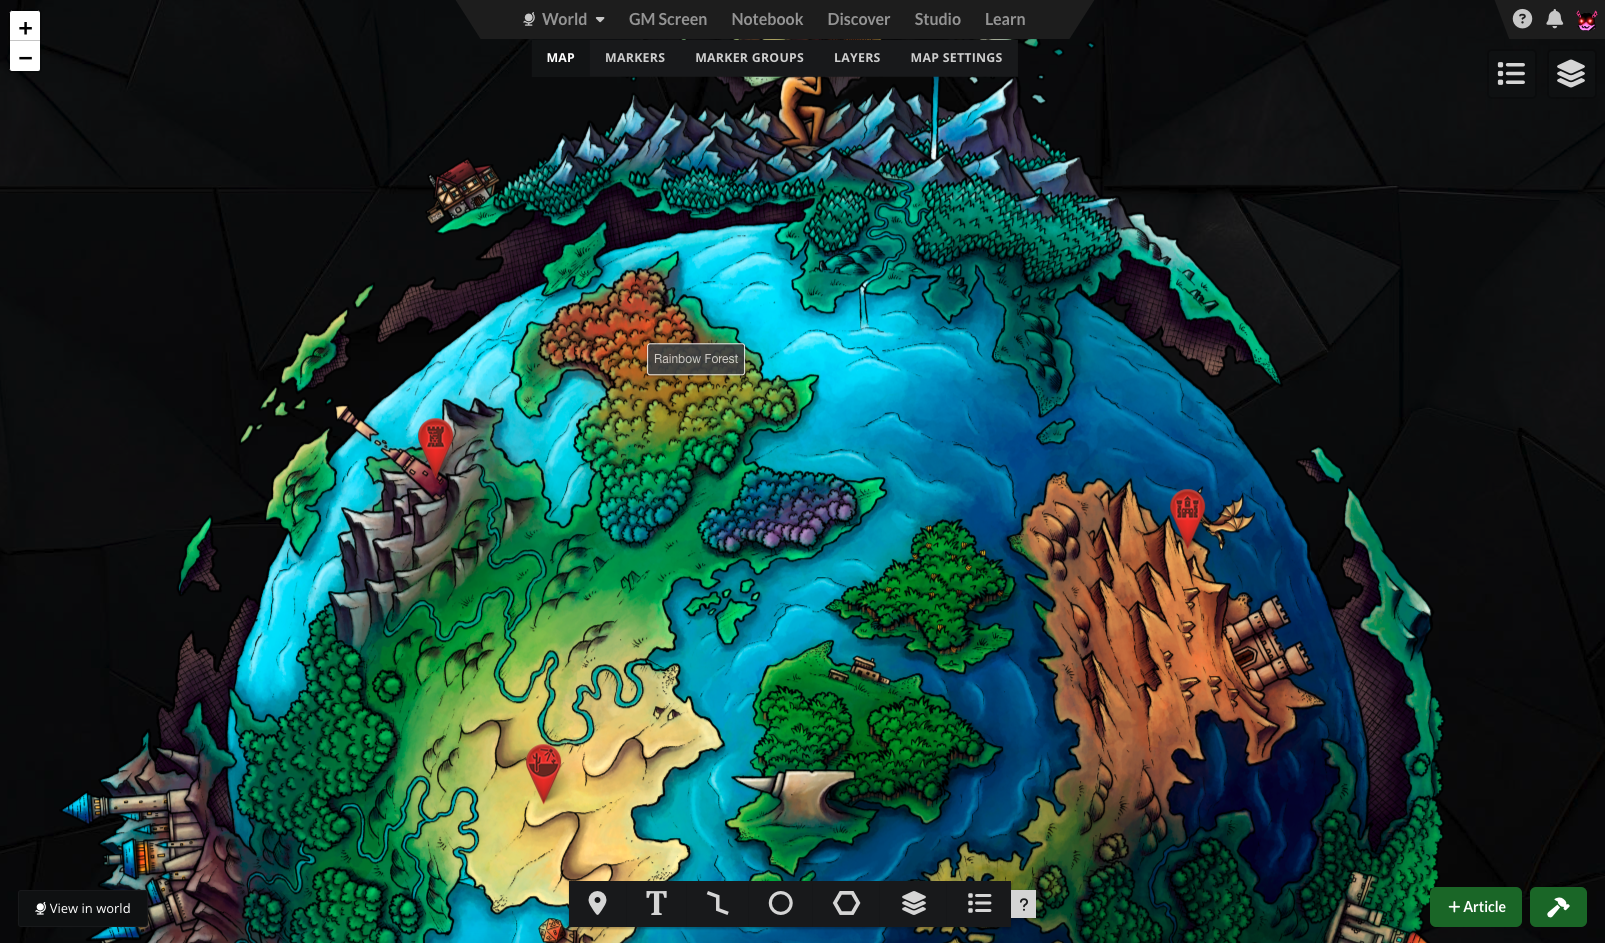
- Most of the screen is taken up by the map. You can zoom, click and drag to pan, zoom in and out with the mouse wheel or zoom buttons, and interact with any markers you have previously added.
- At the top, you can use the tab bar to edit different aspects of the map.
- The toolbar at the bottom has all the tools you need to add interactive elements to the map.
- Click the view button at the bottom left to open the map in view mode.
- Click the Layers button at the top right to toggle map layers (more on that later!)
3. Create your first marker
Markers are what make your map interactive, as you can use them to add dynamic behavior to the map. For example, you can set a map to open another map when clicked.
Let's start by creating a pin, the most common type of marker:
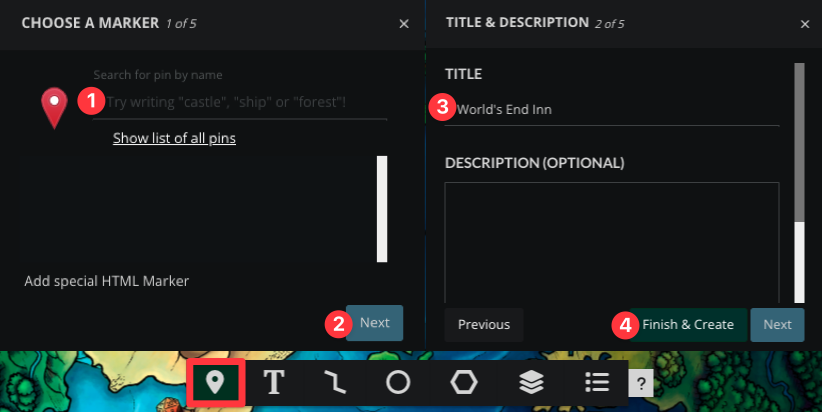
- Click the pin icon in the toolbar.
- Click anywhere on the map to set the pin's location (you can change it later, don't worry if you misclick!)
- A new panel will appear to choose a pin style. Type a pin name to find it (try with a color name!), or click the "Show list of pins" button to view all available pin styles. Click Next when you've chosen one.
- In the next panel screen, give the pin a name.
- Click the green "Finish & Create" button.
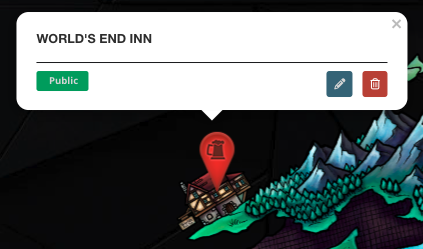
Hooray, you have created your first interactive pin! Click it to see the marker pop-up:
To edit a marker, simply click it and then click the edit button in the pop-up.
Pro-tip: the marker creation pop-up lets you link to articles. You can create articles on the fly with the green "+ Article" button and link them to markers without refreshing your page!
Grandmaster If you're a Grandmaster of the Guild, you can create custom pin icons with any image. Click to learn how to.
Types of marker
There are five types of marker:
- Pins: use them to mark specific points on your map, such as cities, monuments, or other landmarks.
Master Pro-tip: Want a clickable point in your map that is invisible? Look for the pin named "invisible"! It works just like a pin but doesn't display anything. - Master Labels: great for displaying interactive text on the map.
- Master Lines: use lines to mark rivers, roads, and other landmarks that are thin and long. Click anywhere to start the line, and double-click to end it.
- Grandmaster Circle: if you need a large area of the map to be clickable, you can use the circle tool. Click and drag to create the circle.
- Grandmaster Polygon: if you need to mark a large area with a more specific shape than a circle. Click to create the shape you want and click on the initial point to close the polygon.
The creation process is similar for all marker types, so take some time to play with the different options.
4. Create a layer
Layers are separate images that let you display different types of information in the same map. For example, you can have a layer for political borders and another one for topographical information. Here's how to set up a layer!
- Create an image in your computer that is the same size as the base image.
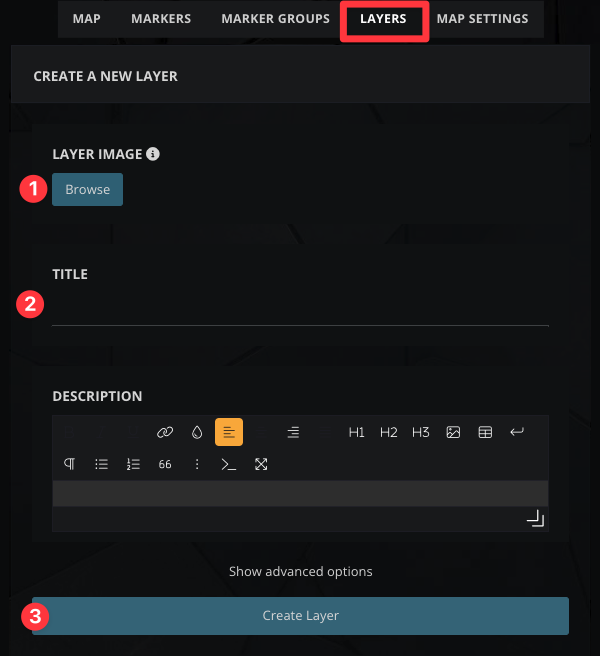
- Click on the "Layers" tab at the top of the map interface.
- On the right, upload an image and give it a name. The description is optional.
If you want the layer to be private, click "Show additional options" and toggle the visibility with the Status field.
Pro-tip: layers can also be transparent (i.e. you can overlay them on the base layer). Click here to learn how.
5. Embed the map in your world
Your map will be accessible in its own page (if it's public), but you can also embed it in any article on World Anvil.
You will find the embed option in the "Map Settings" tab; check this quick how-to for more details.
Advanced options
Interactive maps are a powerful feature, with a lot of options to customize your world. Once you've created a few pins, you'll be ready to dive in to the advanced options.
Advanced marker options
When editing a marker, you have access to many customization options. Most options are the same for all marker types.
You can also see a list of all markers in the map by clicking the "Markers" tab at the top. The list has some quick options (for example, to make the markers public or private), as well as a full edit button.
The marker editing page is divided in three parts:
- What type of marker is it? Defines the type of marker
- What does it do? Sets whether it opens a pop-up or is a direct link (see below).
- Where does it link to? Creates relationships between markers and other parts of your world.
The first section has the same fields as the first panels of the marker creation process. Since you're already familiar with creating markers, let's skip it and take a look at the rest!
Marker behavior
The "What does it do?" section has two tabs:
- Opens a pop-up: Use the fields in this section if you want the marker to display a pop-up on the map when a user clicks it.
- Title: The name of the marker and pop-up title.
- Description: This will appear in the marker pop-up. Leave empty if you are not using the pop-up feature.
- Opens a new page: if you check the checkbox in this tab, the marker will not have a pop-up. Instead, when clicked it will open a linked page or map directly. You can set up the link below.
Marker links
The Where does it link to? section has tabs for different types of content that you can link to the marker. Simply click on the tab for the type of content you want to link to and choose from the drop-down.
If the marker opens a pop-up, all links you add here will be displayed in the pop-up. If the marker opens a page, make sure you only use one of the link types!
Additional options
Click the "Show advanced options" link at the bottom to see these additional options:
- Position/weight: the higher the number in this field, the higher it will appear in marker lists. It has no visible effect on view mode and it's simply a tool you can use to sort the markers in a marker group internally.
- Unique CSS class (Guild-only): use this to customize your marker with CSS.
- Longitude, Latitude, and Height: these are the marker's coordinates. You can edit them manually here, but it's way easier to just drag it around the map with your mouse!
Other marker types
There are a couple of additional marker types:
- Grandmaster Draggable markers: use this if you want other users to be able to move the markers in presentation view.
- Grandmaster HTML pins: use them to have full control over how the marker looks (note: this is an advanced technical feature).
Marker groups
Available to the Master subscription tier and above. Upgrade here.
With marker groups, you can control an entire group of pins on the map!
You can make them visible only to specific subscriber groups (e.g. "GM's Only", or "Elves Only").
If a marker group is viewable, your players & readers can toggle them on and off from the Marker Groups menu (top right). This is good for toggling groups of pins like "Roads", "Cities" or "Resources".
Here's how to create a marker group:
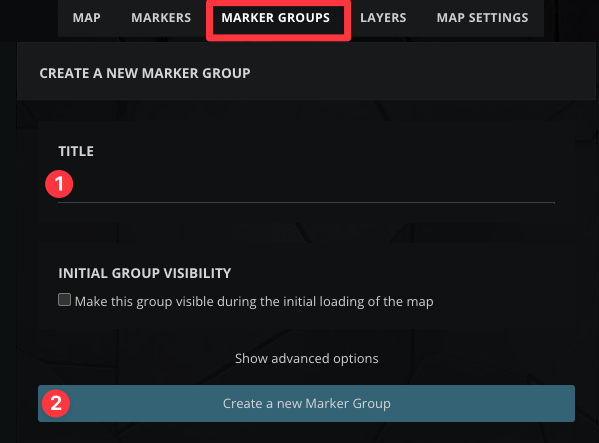
- Click on "Marker groups" at the top.
- On the right, give it a title. If you want markers in this group to be visible when the map loads, check the "initial group visibility" box.
- Click the "Create a new marker group" button.
As always, you can expand the additional options to make the marker group private or only visible to specific subscriber groups.
Adding markers to a group
Here's how to add markers to a marker group:
- Click on "Markers" at the top to see the list of markers.
- For every marker you want to add, click the change button in the Marker Group column and choose a marker group. Each marker can only be in one group.
You can also select a marker group during the marker creation process or in the marker edit page.
Adding layers to marker groups
Additionally, you can also link layers to marker groups. Do this if you want the layer to appear or disappear when you toggle the marker group too:
- Edit the layer and uncollapse the advanced options section.
- Use the "Marker group" dropdown to select a marker group.
- Click the save button.
You could use this to, for example, display a map of the underdark with all its pins overlaid on top of the overworld map.
Pro-tip: you can use layers in marker groups to create transparent layers! Click here to learn more.
Map settings
There are many settings you can use to tweak exactly how your map looks and behaves. Here are all of them, tab by tab!
Basic settings
These are the basic details and contents of your map:
- Title: the name of your map.
- Minimum and maximum zoom: use these fields to change how close or far away can you get from the map. 0 is a zoom level of 100 %; negative numbers represent zoom out and positive numbers represent zoom in.
Pro-tip: anything above 0 will make your map look blurry, so we suggest keeping the maximum zoom level at 0. - Description: the description is visible in view mode when you click the tab on the left.
- Legend: any text here will appear in a floating box in the bottom left corner of the screen. Use it to explain what different symbols on the map mean!
- Master Background image: if you want an image to appear behind the map, upload it to World Anvil and select it with this drop-down. You can also use animated GIFs!
- Master Compass rose image: the image you select here will appear in the bottom right corner of the screen. A great spot for a compass rose to spruce up your map!
Pro-tip: If you've created an image of your map's legend, you can upload it here.
Initialization
These settings affect how the map appears when it first loads.
- Initial zoom level: how zoomed-in should the map be when you load it? 0 is 100 % zoom level.
- Initial center points: if you don't want the map to load centered, you can specify different coordinates here.
Navigation
Use the fields in this tab to link the map to different parts of your world.
The position/weight field lets you change the order in which maps appear in a list. For example, if you want a map to appear at the top of the maps list in the world homepage, give it the highest weight of all maps.
Display & Privacy
These settings affect how and where the map is displayed in the world.
- Guild-only Display this map on the world's homepage: if you don't want the map to be displayed in the world homepage, uncheck this box.
- Master Thumbnail image: the thumbnail is used in the homepage map list, as well as when embedding the map as a thumbnail. Use this field if you don't want the thumbnail image to be the base map layer.
- Status: use this to toggle the entire map between private and public.
- Subscriber groups: if the map is private, you can make it visible to specific subscriber groups here.
Map deletion
Use this section to irreversibly delete the map.
If you simply want to change the base layer image, keep reading to learn how.
Additional settings
Available on the right are two panels:
- Map embed snippet: use the options in this panel to embed the map anywhere on World Anvil.
- Update map primary image: you can upload a new image to replace the base map image here.
Important note: make sure the new image has exactly the same size as the previous one. Markers in your map will not be repositioned to fit the new image, because the system has now way to guess where they should go. The expected dimensions of the new image will appear in the same panel.
