Last update: January 1st, 2025
Interactive maps are a fantastic way to visualize the geography of your setting, and figure out the logistics of your stories! They’re also great for sharing your setting with others. In this lesson, you’ll learn the interactive maps interface, make your first map and pins, and get a taste of how far you can go with them.
Pro-tip: You’ll need a map image for this lesson! Any kind of png, jpeg. or webp image will do. For some free options, check out these map generators or these city map resources.
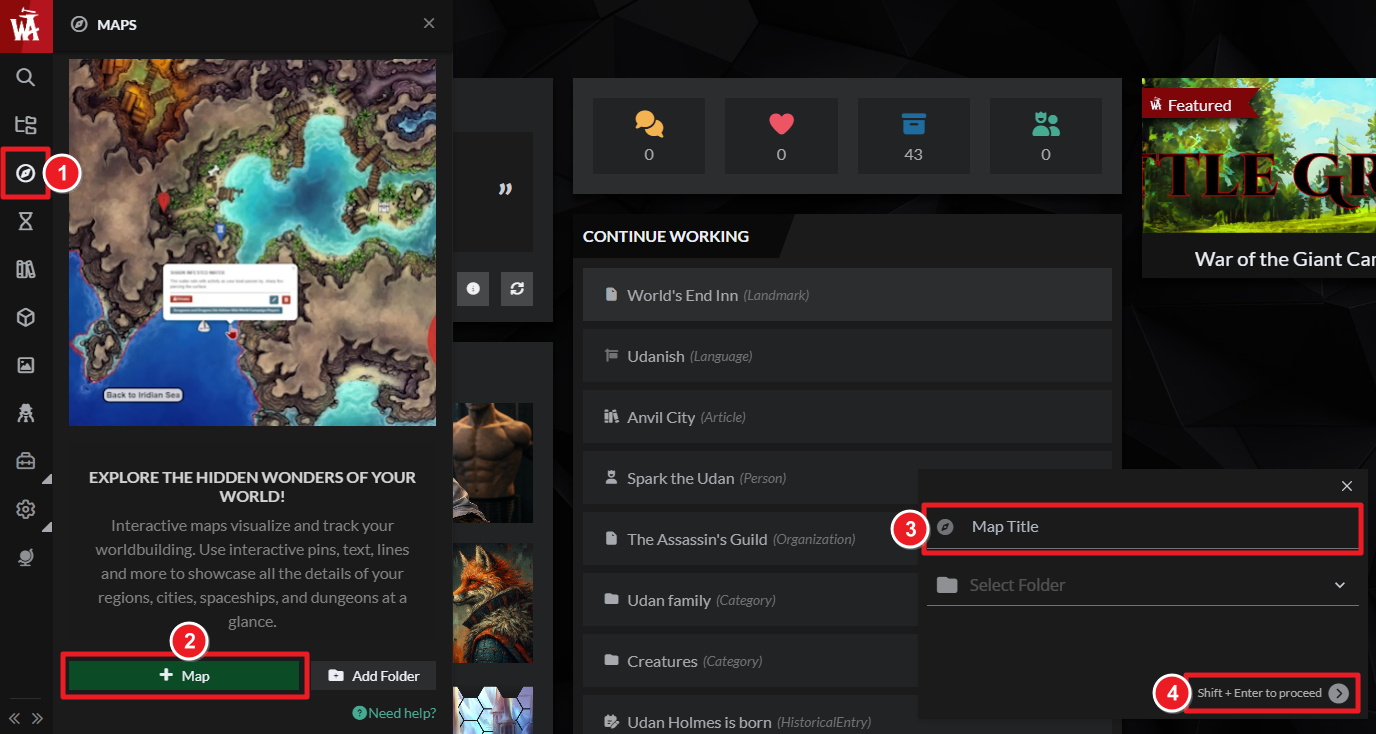
To find interactive maps, click the compass icon. In the slide-menu you can see and manage all the maps you have in your active world. Just click on a map to open it. If you don’t yet have a map, you’ll see a small animation of what interactive maps can do!
Assignment 1: Create your first map
To create a new interactive map:
- Click Interactive Maps on the left sidebar. The slide-menu will open.
- At the bottom of the slide menu, click the green +Map button.
- At the bottom right, a small popup will appear. Add your map’s title, then use Shift+Enter (or click the arrow) to proceed.
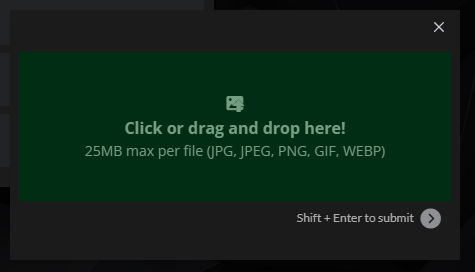
- Next, you’ll see a green rectangle with the text “Click or drag & drop here!”. Drag your map image onto this panel to upload it, or click the green panel and select an image from your computer.
- Once your image is uploaded, your new map will open for the first time, so you can start working.
Quick UI Tour of Interactive Maps
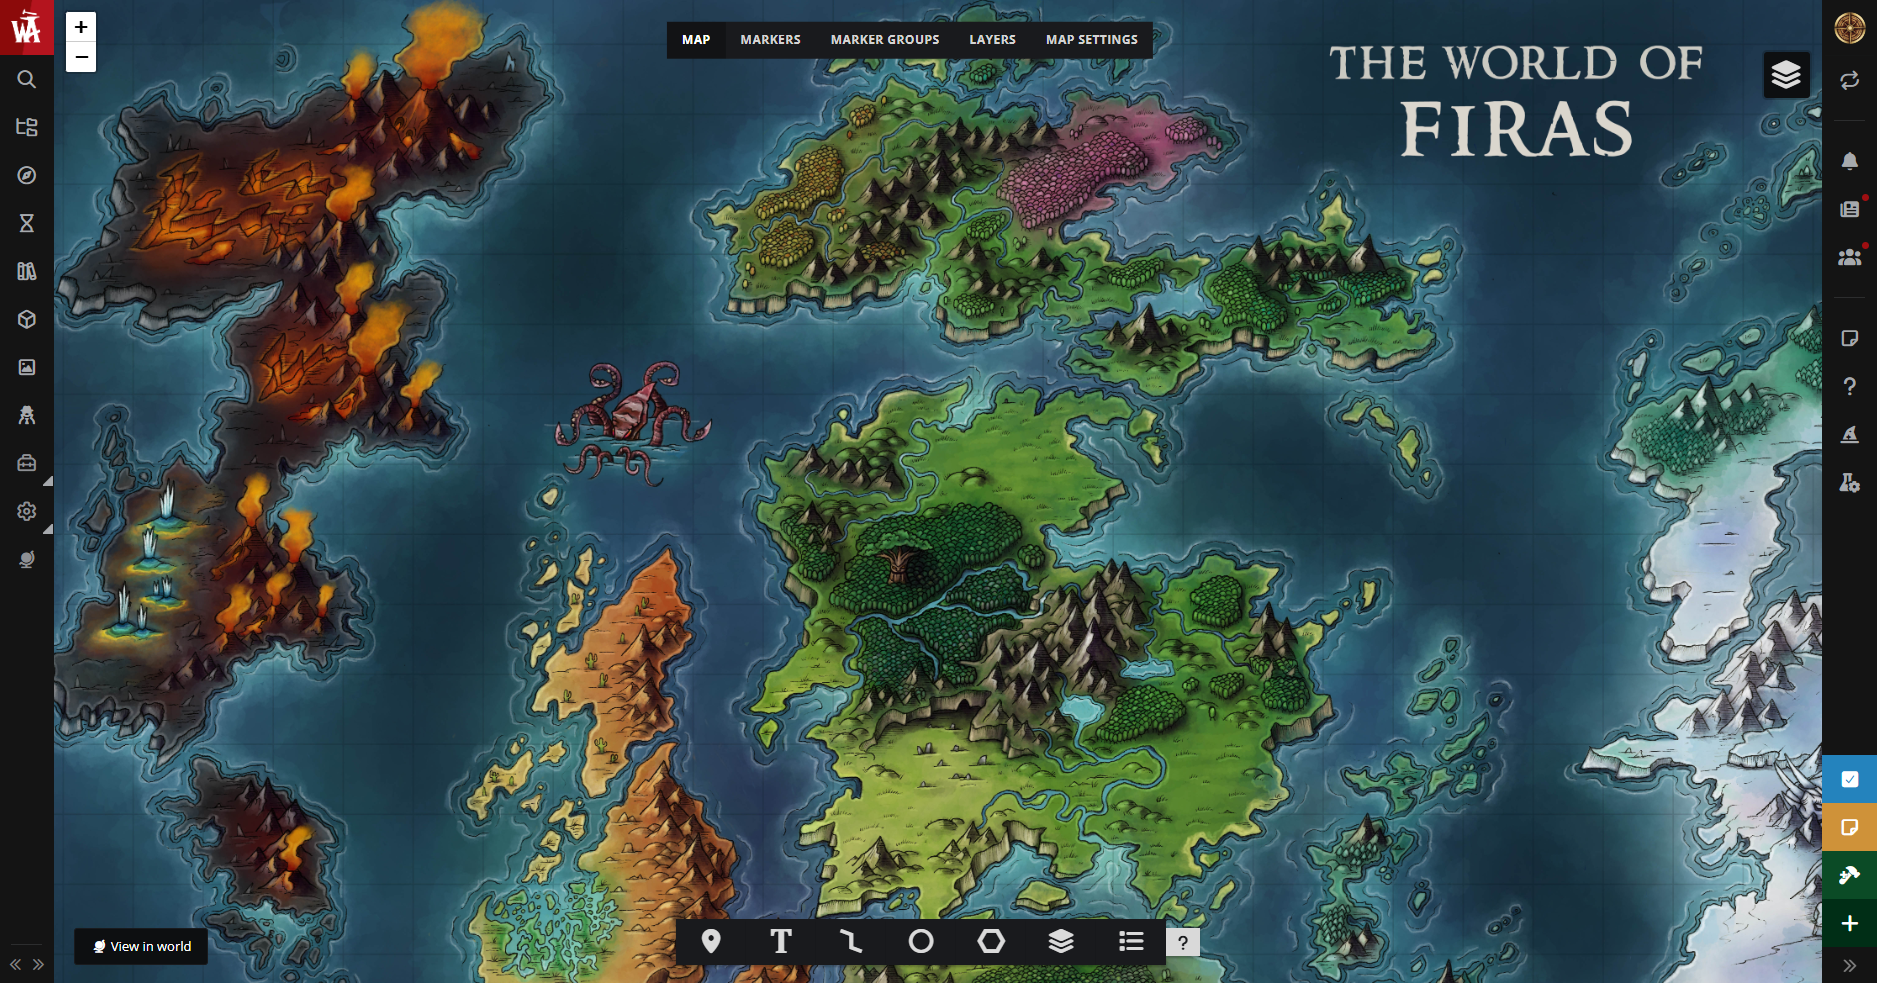
As with timelines, your toolbar is at the bottom centre of your screen. Use this to create different kinds of map markers (like pins, labels, lines, etc), marker groups, and map layers. Any time you need help, click the question mark at the end of the toolbar for the full Guide to Maps.
- In the top centre, there are several tabs for Map, Markers, Marker Groups, Layers and Settings. We’ll explore these more later.

- In the top left corner are the zoom in and out buttons (you can also use the mousewheel for this).
- At the top right is the layers icon, which helps you toggle between different layers of your map (more on that later!)
- At the bottom left is a button “ View in World”. This is the link to your map’s presentation mode, so you can see how it appears to other people. Unlike articles, maps are quite similar in edit and presentation mode.
Assignment 2: Create your first pin
Now you have a map, let’s create a simple map pin!
- Click the pin button on the tool bar.
- Click anywhere to place your pin, or drag it around into position.
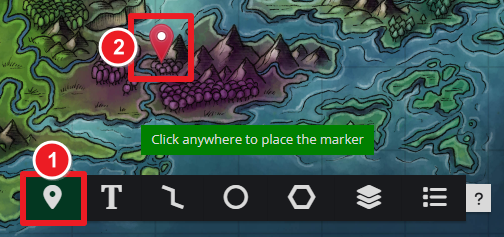
- Once your pin is positioned, a small form will appear—this is where you choose your pin style! Try typing what the pin is for (like castle, river, or asteroid), or type a color (blue, red, yellow). Pins matching your search will appear and you can click the one you want. Click Next to continue.
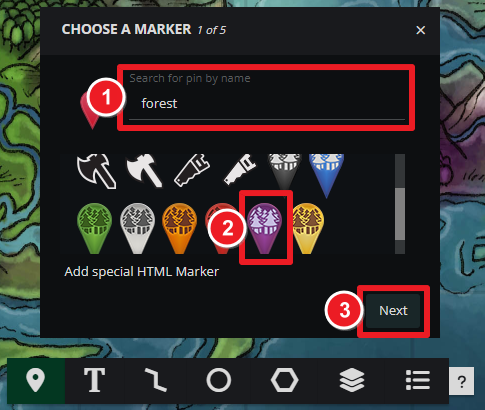
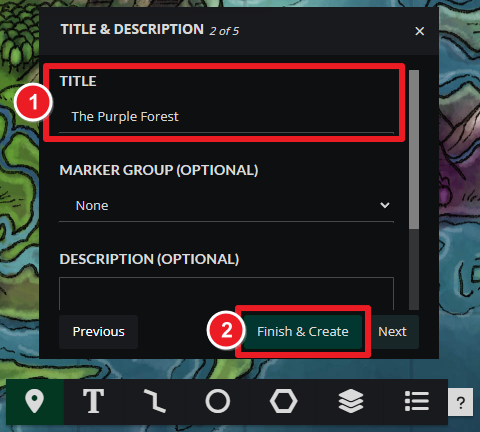
- Now, title your map pin. You can add a short description if you want to.
- Click Finish & Create. Congratulations—your new pin has been created!
- Click on your pin to see the title and description (see image below).
Linking articles to maps markers
Linking articles to your map markers is a great way to keep track of your worldbuilding. It’s also a fantastic way for your readers or players to navigate and explore your world!
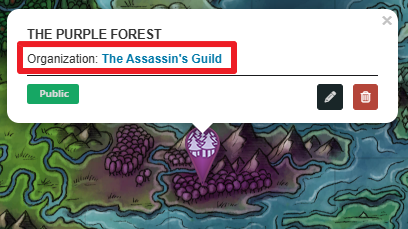
You can link location (geography, settlement or building) articles, organization articles and generic articles to your map pins. You can also link historical events, categories, or even other maps (for example, linking a building map on a city map!).
In edit mode, you can reference a linked article by clicking on it.
In presentation mode, when a reader clicks on a marker with a linked article, it’ll open in a sidebar, so they can browse the article you’ve linked while staying on the map page. This is an interactive and satisfying way to explore a world setting!
Assignment 3: Link an article to a pin!
In this assignment, you’ll link one of your articles from lesson one (either your Tavern/Nightclub or your Assassin’s guild) to a map pin.
To link an article to your map:
- Click the pin button on the tool bar.
- Click anywhere to place your pin, or drag it around into position.
- Once your pin is positioned, search for the pin style you want, and click to select it. Click Next to continue.
- Title your map pin and add a short description, if you want to. Then click Next.
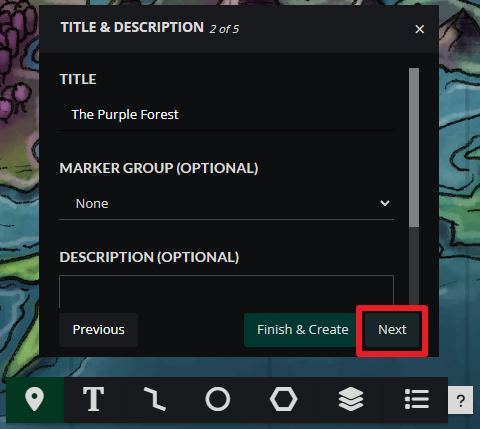
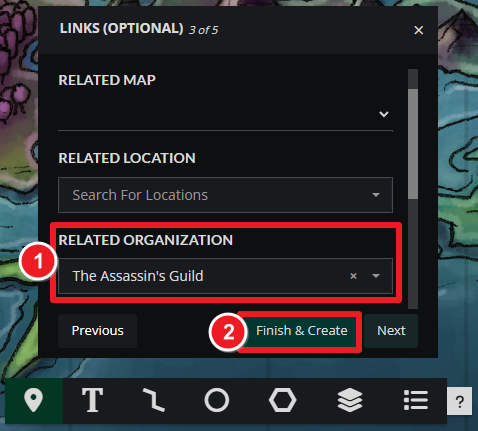
- This screen (3 of 5) is the Links screen! For now, link a Location (your tavern/nightclub) or Organization article (your Assassin’s guild) from Lesson 1.
- Click Finish and Save to create your pin.
- Now, click on your pin to see the title and description. Click on the linked article and it’ll open in a modal window for you to read.
Map workflows
Many worldbuilders find working with maps inspirational: you get new ideas about the places in your world as you browse your map and create!
Use the Article Create button in the bottom right to create new articles for the buildings, landmarks, locations, and settlements you dream up as you work with your map, then link them into your pins. This workflow is a great way to start building out your physical world setting in more detail.
Assignment 4: Create a new article and link it into a pin
In this assignment, you’ll create an article and link it to a map pin. Your article can be any of the following:
- an Organization (like a country, city state, or empire)
- a notable Geographical feature (like a mountain, lake, natural harbor, asteroid belt)
- a natural or man-made Building/Landmark
- an important Settlement in your setting
- Click the Create button at the bottom right of your interface. Select a Geography, Building/Landmark, Settlement, or Organization template. Add a title and write a few words in your article.
- Close the article, by clicking the X at the top right or pressing Esc.
- Now, as in assignment 3, create a new pin! Choose the pin type, give it a title, and link in your article (3 of 5 of the form)!
You can repeat this assignment to build out your physical world setting!
Editing map markers
To edit your map markers, click the pin, then the edit button in the popup.
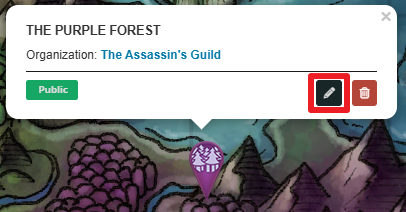
That takes you to the full page edit, where you can control ALL the options for your pin, simple and advanced! You’ll already recognize many of these options, and for the more advanced ones, refer to the Guide to Maps.
Once you’ve made your changes, remember to click Save Changes! Underneath the “Save Changes” button, there’s a link to go back to your map and continue editing.
More map marker options: lines, labels, and areas!
The other kinds of map markers on the toolbar are just as easy to use as the pin marker. Click the button for the marker style you want, then click the map to place your marker.

- Labels are text markers. They come in a few different styles, and are useful for adding important names and text to your maps.
- Lines are useful for tracking character journeys, roads or simple boundaries. Click to create the points of your line, then click the last point again to save, and go onto the next step. You can link articles to lines as well—like session reports, articles about epic journeys, or important roads.
- For Circles, click to position the center of your circle, then drag for the radius.
- Polygons work the same way, and they’re great for creating zones on your map, like city districts, political boundaries, or hot spots. Click the first point again at the end to create your polygon.
Like pins, all these markers are interactive: you can link articles and maps to them.
Pro-tip: You can make draggable pins, so you (and your players) can drag them around the map in View mode! These are ideal for moving assets, like your group of heroes on a region map, or even players on a battle map. To set this up, click “is draggable” on page 5 of the creation form. Only Pins and Label markers can be draggable. Higher Guild tiers can also upload their own pin assets (of, for example, character portraits), giving infinite flexibility!
Map Settings
At the top of your map are several tabs, including Map Settings. You have a lot of control over your map. Just some of the things you can do in maps settings include:

- Updating the primary map image (useful if you’ve updated your map, but don’t want to lose your pins!).
- Altering the maximum and minimum possible zoom level.
- Adding a background image, a compass rose, and a legend.
- Changing the privacy of your map.
- Choosing whether or not your map appears on your world’s homepage.
Assignment 5: Adjust the possible Zoom level of your map
To control how much people can zoom in and out of your map, you’re going to set the initial zoom level.
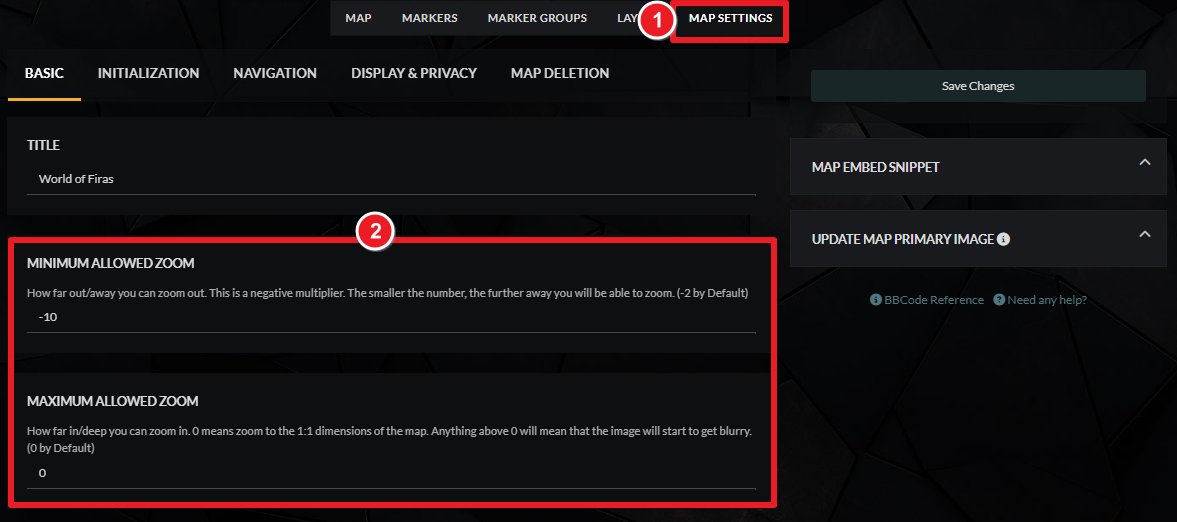
- At the top of your map, you’ll see a series of tabs. Click the last one, Map Settings.
- Now, under the Basic tab, you’ll see Minimum Allowed Zoom and Maximum Allowed Zoom. Experiment with adjusting these figures, then click Save Changes.
- Now go to the Initialization tab. Change the Initial Zoom Level (the zoom level at which the map loads), then click Save Changes.

- Go back to the “map” tab at the top, and experiment with zooming in and out of your map, using the mouse wheel or the +- buttons at the top left. You might need to go back and alter the settings to get exactly the effect you want!
Marker Groups, Layers and more!
There’s plenty more you can do with interactive maps. Once you’ve got the basics down, I recommend reading the Guide to Maps to learn just how far you can go with this amazing feature.
A few of the more popular interactive maps features include:
Layers
You can add different map images as layers to your map: e.g. floors in a building or vehicle, an underdark layer beneath your region map. This is great for creating a 3D sense of your setting! Learn about map layers here. You can also create partially transparent layers, so you can see the layers beneath (learn how here!) great for creating overlays like currents, politics or topography.
Creating a map-trail
Wouldn’t it be cool if your readers could go from your galaxy map to your planet, to your continent, region, city, and down to a single building? You can do that by linking maps to other maps to open directly!
Embed maps in articles
You can embed your maps in your articles, and in other places in your world! Learn how here.
Marker groups
Some interactive maps need a lot of pins, and it’s helpful for you—and your readers—to be able to toggle those on and off, for clarity. To do this, you can group your pins by marker group! You might group pins by type, like Ruins, Resources, and Political Pins. You could group by faction, like Stormcloaks versus Imperials. You can even create groups of pins that only certain people can see—like “For GM Eyes Only”, or “Elf Knowledge” for only your elf characters—we’ll talk more about setting up advanced privacy in the next lesson. Read more about marker groups here.
Click here to continue with the next lesson in the Get Started Wizard, or keep adding pins to build out your map!
What's next?
If you're a Guild Member, click here to continue with the next lesson in the Get Started Wizard to learn about secrets and subscriber groups.
If you have a free account, the features in the next lesson aren't available to you, so this is the end of this course for you. Hooray! Here are some ideas on what to do next:
- Not sure what to worldbuild next? Take our "How to Start Worldbuilding" Course! In the top bar of the website, click Courses then choose "How to Start Worldbuilding".
- Continue exploring the World Anvil platform by following one of our workflows
- Get worldbuilding inspiration with our worldbuilding advice videos
- Focus your worldbuilding vision with the World Anvil worldbuilding meta! Click Settings then Meta to find it!
So, what are you waiting for? Grab your hammer, and go worldbuild!