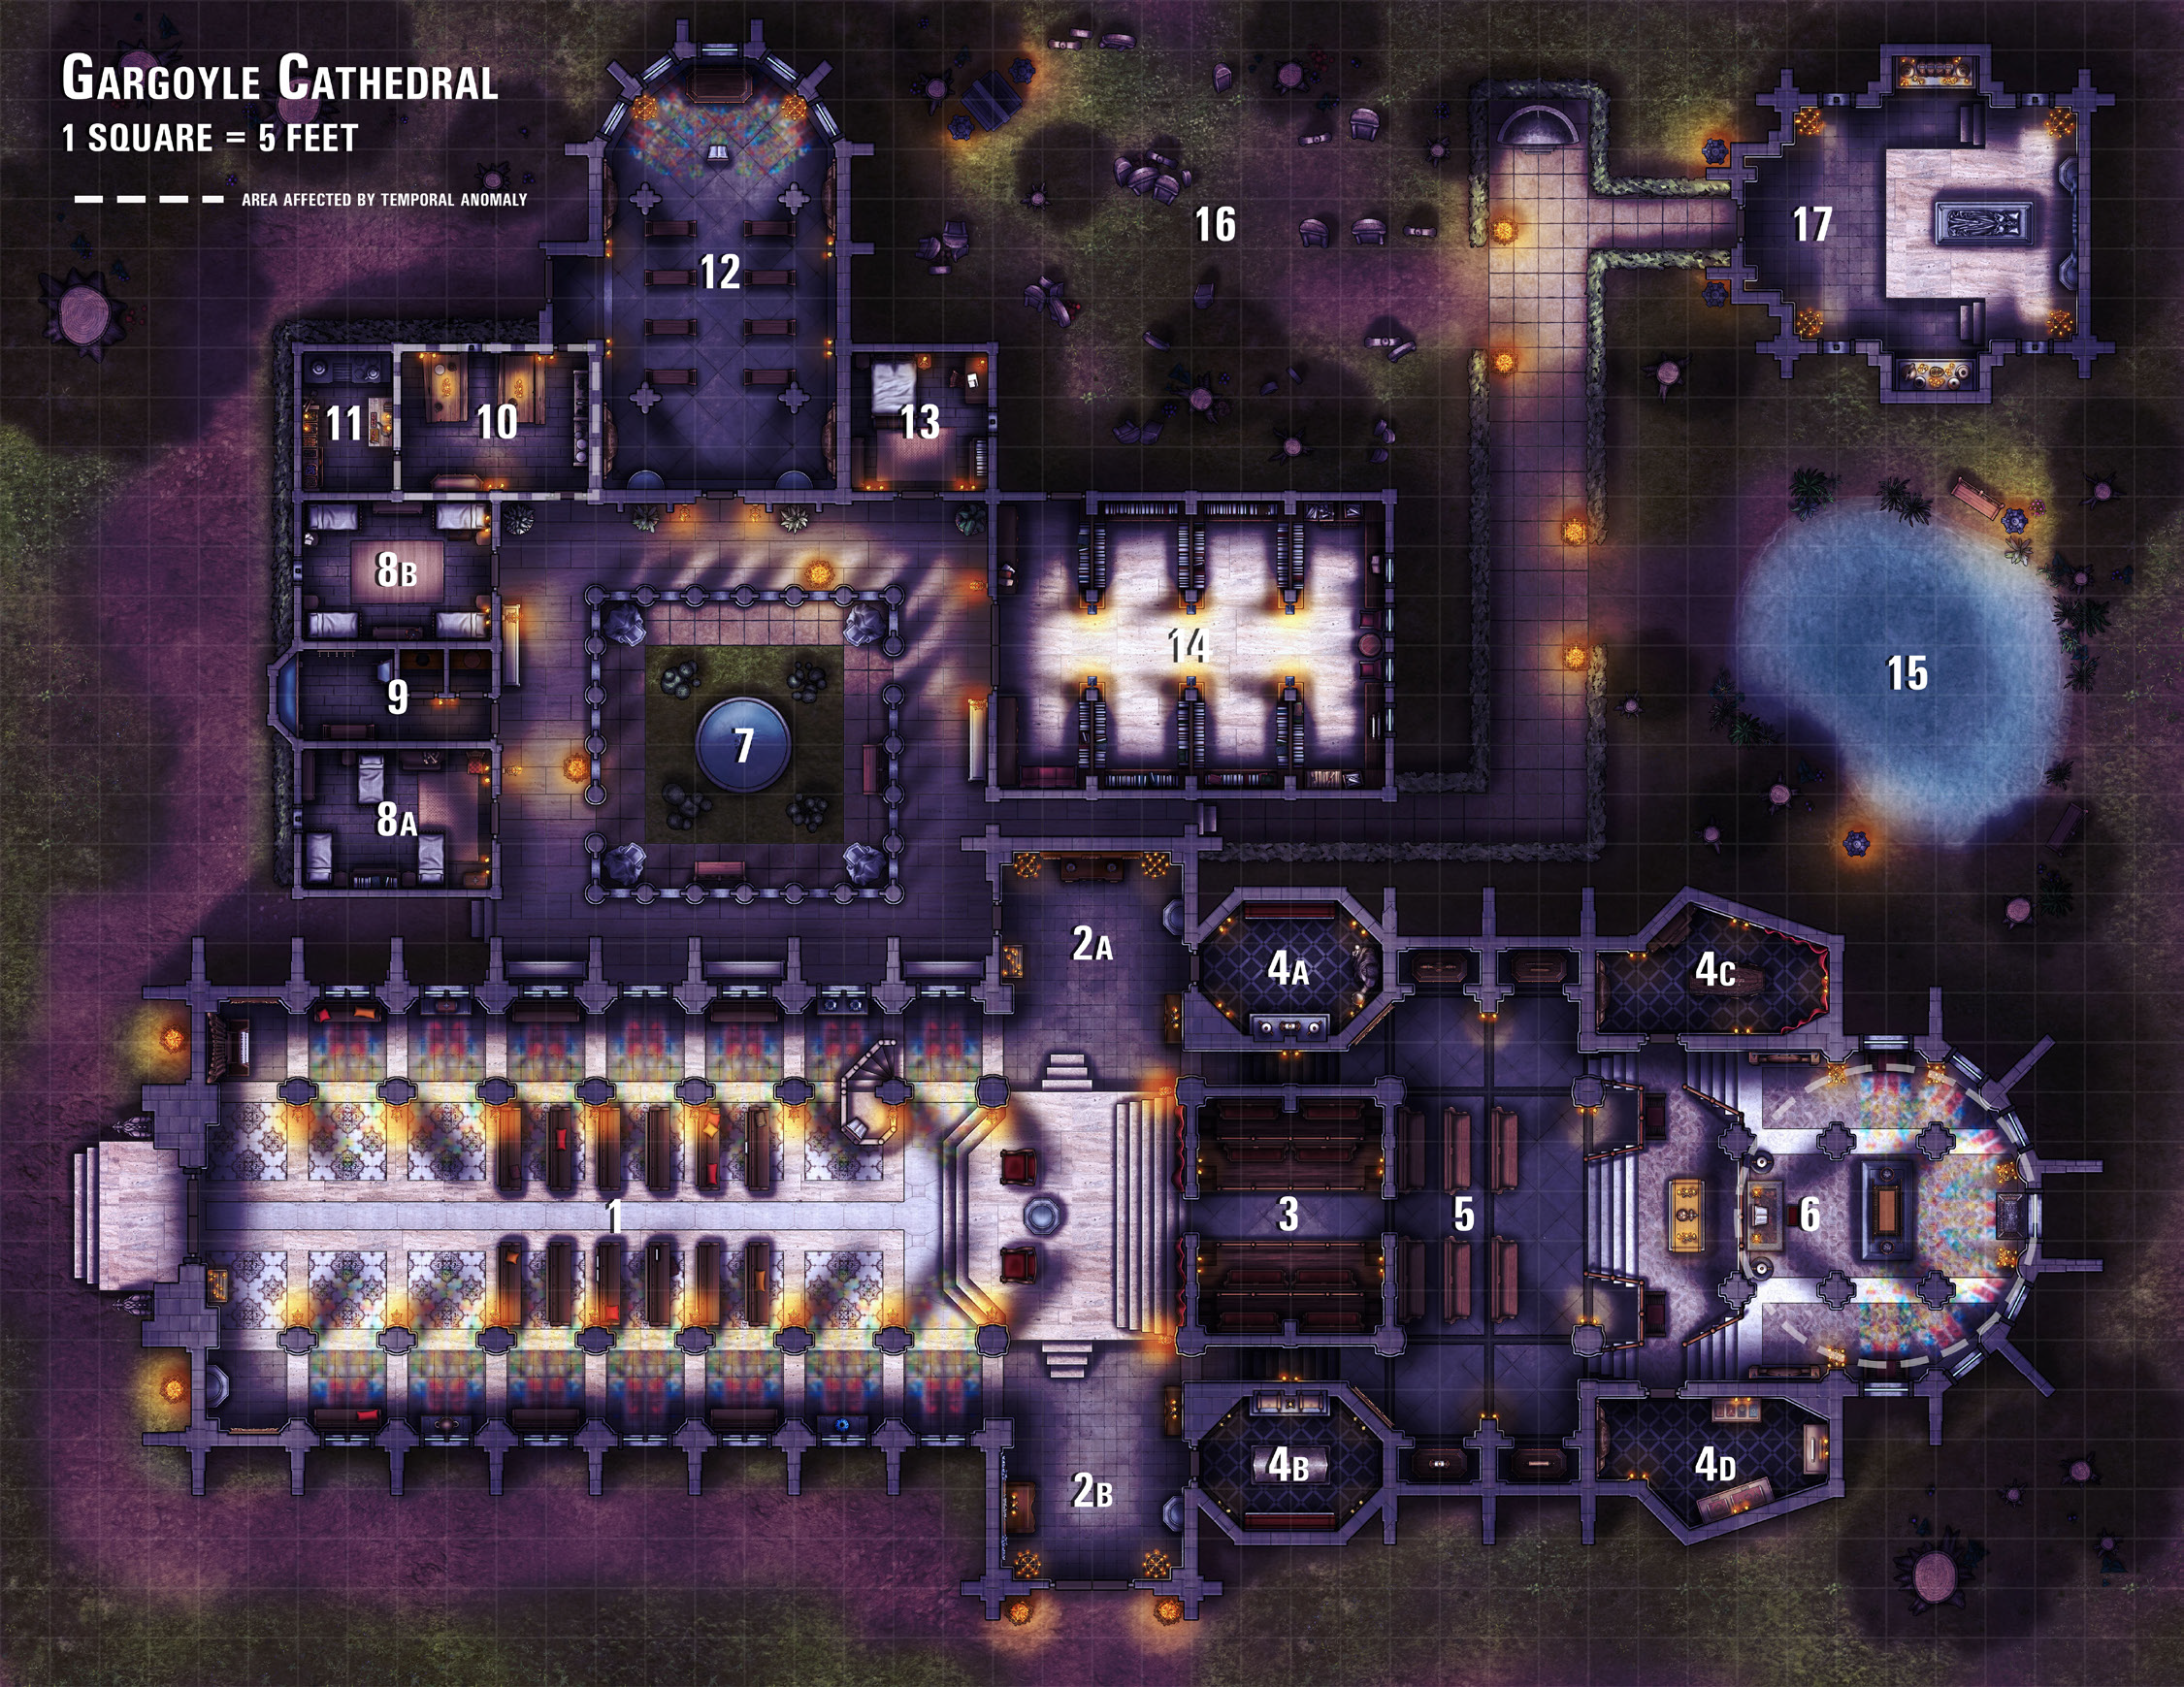
Gargoyle Cathedral
01 - Nave
The front doors are locked.Upon entering this room, you all get the strong impression that you have been here before. Yet, none of you are able to recall ever having been here or any place like it. This colossal room is where the regular ceremonies and sermons are held; it is easily the most impressive chamber in the cathedral. Stone columns help lift the room’s 30-foot-high ceilings. Two rows of pews face a two-foot-tall dais upon which two comfortable chairs stand. Between these chairs, there is a font filled with holy water. Tall stained glass windows flank both sides of the nave, casting multicolored light on the magnificently detailed floors.
Encounter: Gargoyles.
The columns holding the ceiling appear to be dressed with stone statues resembling gargoyles. The gargoyles are so high above the floor that only characters who actively look upward or have passive Wisdom (Perception) scores of 14 or better will notice them. A character who studies the columns and succeeds on a DC 13 Intelligence (Investigation) check recognizes that the gargoyles aren’t a part of the cathedral’s original design. The gargoyles wait for the characters to spread around the room before they launch their attack. The gargoyles use hit-and-run tactics, hoping to draw the characters into the hazards described in areas 2 and 3. GARGOYLE x2Treasure: Holy Water.
There is enough holy water in the font at the center of the dais to fill 8 flasks.Reward: 900xp
02 A and B - Transepts
The exterior doors to both transepts are locked.This alcove offers additional entrances and exits to the nave. Each one contains a font so worshippers may wash before they begin prayer.2B
The body of a robed man lies face down in a pool of his own blood in the transept. He still clutches a hatchet in his right hand. A thin layer of sparkling dust covers the man, the floor, and all solid surfaces.The body of a robed man lies face down in a pool of his own blood in the transept. He still clutches a hatchet in his right hand. A thin layer of sparkling dust covers the man, the floor, and all solid surfaces.
Hazard: Blinding Dust.
The dust in the southern transept is blinding dust left behind by a dust mephit. When a non-elemental creature enters the area for the first time on a turn or starts its turn here, it must make a DC 10 Constitution saving throw. On a failed saving throw, the creature becomes blinded until the start of its next turn.Reward: 900xp
03 - Choir
Two seating areas flank this corridor. The cathedral’s choir normally sits in this room, providing choral music during the cathedral’s major ceremonies.
Hazard: Magic Circle.
The priests cast a magic circle here, hoping to harm the elementals plaguing the cathedral. Unfortunately, the dark nature of the gargoyles corrupted the circle. Humanoids cannot willingly enter this area by nonmagical means. If a humanoid tries to use teleportation or interplanar travel, it must first succeed on a DC 13 Charisma saving throw. Humanoids have disadvantage on attack rolls against targets in the area, and targets within the area can’t be charmed, frightened, or possessed by humanoids. A dispel magic spell removes the protections. Otherwise, the protections last for 24 hours and then disappear.Treasure: Powdered Silver.
A character who searches under the choral pews and succeeds on a DC 11 Intelligence (Investigation) check discovers a bag of powdered silver worth 1,000 gp.Reward: 900xp
04 A, B, C and D - Chapels
The doors to chapels 4a and 4b are locked.The monks stored important items in this small room, only to be brought out during important events. There are religious items carefully stored away in boxes and on shelves.
Chapel 4a. Encounter: Stone Golem.
A statue depicting an important saint or demigod stands against the eastern wall of the chapel.A character who examines the statue and succeeds on a DC 10 Intelligence (Religion) check will know who it is (Michael the Archangel). As soon as a character comes within 5 feet of the statue, it animates, possessed by the dark elemental magic contaminating the cathedral. STONE GOLEM
Reward: 2900xp
Chapel 4b. Trap: Symbol of Despair.
A symbol of despair spell protects this area, triggered when any creature other than the cathedral’s highest-ranking clergy members enters the room. Once triggered, the glyph glows, filling a 60-foot-radius sphere with dim light for 10 minutes, after which time the spell ends. Each creature in the sphere must make a DC 15 Wisdom saving throw when the glyph activates. A creature that enters the sphere for the first time on a turn or ends its turn must also make the saving throw. On a failed saving throw, the target is overwhelmed with despair for 1 minute. It can’t attack or target any creature with harmful abilities, spells, or other magical effects during this time. Noticing the symbol requires a successful DC 15 Intelligence (Arcana) check.Reward: 900xp
Chapels 4b and 4d. Treasure: Holy Relics.
Chapels 4b and 4d both contain many valuable holy relics. The value of the relics in a room equals $1250.Chapels 4c and 4d. Encounter: Gargoyles and Dust Mephits.
Dangerous elementals lurk in chapels 4c and 4d. If they hear the characters approaching, they revert to their stone statue forms and hide in the shadows. Once they reveal their true nature, they exit the area, preferring to take the fight to where they can benefit from their flying speeds. GARGOYLE x1 Passive perception 10 DUST MEPHITPassive perception 12Reward: 550xp
Chapel 4c. Strange Coffin.
A large wooden coffin dominates the center of the room.Strong transmutation magic exudes from it. Before the characters entered the area, the gargoyles were inspecting it, trying to find a way to open it. An arcane lock seals the coffin’s lid in place, requiring a Strength score of 25 or better to break it open. A character that reads the note in area 8a will automatically know the command word used to open the coffin—it’s whatever they want it to be. The inside of the coffin is empty except for a single silver key. This key can be used to open the stone sarcophagus in area 17.
05 - Chancel
Four wooden pews offer a place for clergy members to sit during service. A shattered pike lies on the floor just before the pews, splinters covering the ground.
06 - High Altar
The high altar is an expertly crafted wooden table upon which the cathedral’s most important relics stand during service, but currently the altar stands bare. Glistening shards of black rock lie strewn about the area.
Fixed Point: Wibbly-Wobbly Timey-Wimey.
This entire area exudes extreme levels of transmutation magic, seemingly emanating from the high altar itself. When a creature comes within 15 feet of the altar, it must make a DC 10 Charisma saving throw. On a failed saving throw, the target experiences a distortion in time. Roll a d6 on the table below to determine what happens. After a creature makes a saving throw against this magic, it is immune to the effects of the altar for 24 hours. If a character that previously discovered the note in area 8a enters this area, they automatically fail their saving throw and travel 10 years into the past.| d6 | Distortion Outcome |
|---|---|
| 1 | The creature becomes 1d20 years older. A greater restoration spell can restore the creature’s age to normal. |
| 2 | The creature becomes 1d20 years younger (but never any younger than 1 year old). A greater restoration spell can restore the creature’s age to normal. |
| 3 or 4 | The creature is pushed 10 years into the future. |
| 5 or 6 | The creature is pushed 10 years into the past. |
Development: De-aged Gargoyles.
The black shards on the floor are actually shards of evil elemental earth; they are the gargoyles in their immature form. If a character removes one of the shards from this area, it immediately returns to its original form, becoming a gargoyle. There are six such shards here. The gargoyle will attack the party as soon as it is restored to its original form. GARGOYLE x6Reward for gargoyles: 450xp per gargoyle
07 - Cloister
A large, cold-water fountain dominates the center of this open-air park. Pathways surround the grassy area.
Trap: Elemental Exchange.
There is a visible glyph inscribed on the fountain’s southern edge. This design is the same glyph featured on the cover of the blue book in area 13. If a creature speaks aloud the words “servitore dell’acqua” while within 5 feet of the glyph, they are banished to the elemental plane of water. If the creature cannot breathe water, it begins to drown. Then, a water elemental appears in the same space the banished creature previously occupied. The elemental immediately attacks any creatures within 10 feet of the fountain but won’t leave the area otherwise. It remains for 1 hour or until it is destroyed or dispelled. Once the water elemental is gone, the creature whose place it took returns to the same space it left or the nearest unoccupied space. WATER ELEMENTALReward: 1800xp an additional 500xp if they are able to defeat the elemental before the hostage dies
08 - Monks’ Dormitories
The monks used these small, ascetic chambers to rest, read, and pray.
Area 8a. Fixed Point: The Note.
A small wooden box is shoved under one of the monk’s beds in area 8. Inside the box, there is a folded note. It is addressed to the character holding it. Strangely, the writing is in the character’s own handwriting. The note’s subject matter is subjective to the reader and was actually written by a future version of the reader sent 10 years into the past. What the note says is ultimately up to you, but it should recall whatever events are currently happening in the present. For example, if another character says something out loud while the character is reading the letter from themselves, then the note reflects that. The note explains that the note’s author is a future version of the character trapped 10 years in the cathedral’s past, when the building was still in ruins. The author worked alongside a man named Doctor Owens to find a way back to the future using the mausoleum at the northeastern end of the complex. Before the characters can enter the mausoleum, they must recover the key left behind in the chapel north of the high altar. The key is kept in a magically sealed coffin there. Finally, the note warns the character to watch out for the “ones that don’t move for they are the most dangerous ones. Unfortunately, I can’t do anything to save us, as this note proves that what happened to us already happened. However, there is still time to save the others. Good luck!” Once the character reads this note addressed to themselves, it creates a fixed point in time. See the “Fixed Points and Paradoxes” section for details.Area 8b. Encounter: Quantum-Locked Gargoyle.
A statue resembling an angel stands at the center of the room. It clasps its hands over its face as if it is weeping. The statue is actually a quantum-locked gargoyle. Any character associated with a fixed point in time that fights this creature automatically fails saving throws against its Time Displacement action—the target travels 10 years into the cathedral’s past. Quantum-Locked Gargoyle x1Reward: 2300xp
09 - Bathroom
The bathroom boasts a trough-like wash basin for cleaning and two private toilets.
10 - Dining room
When the characters first approach the dining room:a rat crawls out from a crack in the door. It moves a few feet before suddenly collapsing on the ground. Breathing raggedly, it begins to age rapidly, its hair turning white and skin turning gray and shriveled. Soon, it’s dead from old age.Room's general description:
Two large, rectangular wooden tables flanked by benches offer a spot for the cathedral’s monks to dine. A shelf against the western wall holds the monk’s plate ware, utensils, and pitchers, plus a few bottles of wine.
Hazard: Time Distortion.
The entire area exudes a strong aura of transmutation magic. If the characters enter the dining room, they risk sharing a fate similar to the rat. When a creature enters the dining room for the first time on a turn or ends its turn in the dining room, it must make a DC 15 Constitution saving throw. On a failed saving throw, the creature ages 1d20 years. On a successful saving throw, the creature only ages 1d6 years. A greater restoration spell returns the creature to its normal age.Encounter: Apple Test.
The gargoyle in area 11 rolls apples into the room every few hours to see if the time distortion effect is still in place. The apples immediately shrivel and rot to nothing, causing the old gargoyle to sigh with disappointment.Fixed Point: Familiar Item.
If one of the characters read the note in area 8 and created a fixed point in time, their favorite weapon, arcane focus, or similar object of value is hanging on the wall above the tables. The beloved item cannot come within 5 feet of its duplicate. If this happens, it creates a burst of temporal energy. Any creature within 5 feet of the two items must make a DC 10 Constitution saving throw, taking 6 (1d12) force damage on a failed saving throw or half as much on a successful one.11 - Kitchen and Pantry
A large iron oven dominates the north part of this chamber. A shelf holding all of the cathedral’s food preserves stands against the western wall.
Encounter: Ancient Gargoyle.
A gargoyle entered this area through the dining room, which caused it to age rapidly. Terrified to return the way it came, it waits in this room. The gargoyle is hundreds of years old. If the characters encourage it to fight, it makes all of its attack rolls with disadvantage to account for its venerable nature. It won’t leave the kitchen, hoping it finds a way to escape that doesn’t involve crossing the threshold. If the characters opt to speak with the gargoyle, it explains that many parts of the cathedral are affected by similar time distortions, notably the high altar (area 6). The gargoyle believes that the “gargoyles that only move when they aren’t being watched” are responsible for the time distortions. It mentions that there are some of those creatures in the chapter house (area 12). GARGOYLEReward: 300xp if they fight the gargoyle and 450xp if they speak with it instead
12 - Chapter House
All of the doors to this chamber are barred from the outside. A character may use their action to remove the bar. From inside, a creature must succeed on a DC 22 Strength check to break the doors open. Description from inside the room:Claw marks cover the inside of these doors as if something was trying to scratch its way out of the room.General description:
The monks use this temple for private worship. Although it is smaller than the nave, it is still quite impressive, thanks to the attention to detail put into the architecture.
Encounter: Quantum-Locked Gargoyles.
Statues resembling angels covering their faces stand against the walls of this temple. These creatures are quantum-locked gargoyles. Any character associated with a fixed point in time that fights this creature automatically fails saving throws against its Time Displacement action—the target travels 10 years into the cathedral’s past. Quantum-Locked Gargoyle x1Reward: 2300xp
13 - Dean’s Quarters
The door to this room is slightly ajar. Characters who come within a few feet of the door can hear the dust mephits bickering within.The cathedral’s highest-ranking monk used this chamber for rest and relaxation. It features a large, comfortable-looking bed, an ornate desk, and a bookshelf filled with religious tomes.
Encounter: Dust Elementals.
Dust elemental servants of the gargoyles gather in this chamber, leaving traces of dust all over the bed, desk, and shelves. None of them remember the reason that the gargoyles sent them into the room in the first place. DUST MEPHIT x1 Dust Quasielemental x1Treasure: Candle of Water Elemental Command.
Characters who search the dean’s bookshelf and succeed on a DC 15 Intelligence (Arcana) check notice that there is a book that seems out of place. The book is blue and decorated with a glyph. Its title reads, “Servitore Dell’acqua.” A space in the center of the book has been cut away to make room for a candle of water elemental command.14 - Library
Hundreds of books crowd this library’s tall, oak shelves. The cathedral’s monks wrote many of the books.
Encounter: Gargoyles.
Gargoyles and their servants gather here, searching for books to explain the strange temporal distortions found throughout the cathedral. GARGOYLES x2 DUST MEPHIT x115 - Pond
A pond choked with lily pads and algae offers another area of tranquility and reflection for the cathedral’s clergy.
16 - Graveyard
A supernatural chill grips this area. Ancient cracked tombstones— many of which predate the main cathedral—push out of this graveyard’s dark soil and crabby grass.
Encounter: Quantum-Locked Gargoyles.
A statue resembling an angel covering its face stands amid the tombstones. This creature is a quantum-locked gargoyle. Any character associated with a fixed point in time that fights this creature automatically fails saving throws against its Time Displacement action—the target travels 10 years into the cathedral’s past.Fixed Point: Familiar Tombstone.
If the characters take the time to examine the tombstones, they discover one tombstone with a familiar name upon it— one of their own. It can be the same character that read the note in area 8a or a different one. The date on the tombstone states that the character died ten years ago, “defending the cathedral from evil.”17 - Mausoleum
The name above the door of this impressive private tomb reads “Doctor Walter Henry Owens.” Its door is carved to reflect a bearded man holding scrolls under his left arm and a compass in the other.Inside:
An impressive stone sarcophagus sits atop a two-foot-tall dias, its lid carved similarly to the one out front, except it lacks the scrolls and compass. Relics, jewels, and small chests cover stone benches in the northern and southern walls.
Fixed Point: The Sarcophagus.
A character who examines the sarcophagus discovers a glyph carved to resemble a flower with the words “St. John’s Ambulance” arched over it. There is a keyhole at the center of the glyph. The lid of the sarcophagus is magically locked. Only the key found in area 4c opens it. Otherwise, nothing short of a wish spell or divine intervention— such as the meddling of an aevarut —will open the sarcophagus. The sarcophagus is bigger on the inside than on the outside. A short flight of stairs leads down from the sarcophagus into an extradimensional space measuring 30 feet in diameter with equally high ceilings. Hallways branch off from the central area, disappearing further into extradimensional space. At the center of the space stands a glowing column. A strange control console covered in flickering buttons, long levers, and a myriad of switches surrounds the column, their functions a complete mystery.Structure
Exposition
Fixed Points and Paradoxes
Much of this adventure deals with time travel and pre-destiny. Be sure to read the adventure in advance, especially areas that mention paradoxes and fixed points. A fixed point in time occurs when a character witnesses evidence of something a future version of themselves did in the past. For example, the note in area 8a was written by the same character that discovers and reads it, except from 10 years in the past after a temporal anomaly sent the character back in time. Because the character discovered the note, they are pre-destined to travel 10 years into the past and write the note. If the character willingly tries to do anything to contradict the actions that led to that fixed point in time (this includes dying), it creates a paradox. When a paradox occurs, a shimmering dome-shaped wall of force (as the spell) surrounds the entire cathedral and remains until the character continues on the predestined path. Additionally, an aevarut arrives. The aevarut threatens that if the character does not course-correct, the Denizens of Order will be forced to “cleanse” the place to preserve the fabric of time and space. Characters who refuse to cooperate must fight the aevarut. If they successfully destroy the aevarut, the dome lifts, and they are free to do as they please—at the risk of destroying all time and space, of course. The implications of such actions are up to you to decide. AevarutComponents
Goals
- Team 8 needs to find and destroy both the altar and the strange time machine that the doctor has been using to bend time around this cathedral. Doing so will end the time distortions on this place.
Hooks
- Team 8 was hired by Mouse and Moxie to investigate the strange events at the cathedral. It has been a landmark within the city for more then a century, but now it is closed. There are rumors that the place is haunted or possessed by evil spirits. Either way, the church refuses to use the space any longer. Find our what is going on at the cathedral and resolve the issue if you can.
- Moxie and Mouse have agreed to pay Team 8 with 2 Greater Restoration scrolls for completing this job.
Backdrops
Locations
Saint Mark's Episcopal Cathedral
1245 10th Ave E, Seattle, WA 98102 Location history and Information The cathedral that was built on this land was destroyed by unexplained events (A Shadow Rift took it into the Shadow Realm). in 2137, the building was in ruins. In 2144 funds were raised to rebuild the cathedral and it was completed in 2146. However, the cathedral was closed after only a few months of being used due to the strange events that continuously occur on this site (due to the doctor's time experiments). Unless stated otherwise, the cathedral has the following features:Architecture.
The cathedral’s builders crafted the walls and floors from huge limestone blocks. Wood details line the interior of most of the buildings. Impressive murals cover most walls, and painstakingly maintained tile mosaics cover most floors.Ceilings.
Colossal flying buttresses surrounding the building allow its open-air nave to have 30-foothigh ceilings. Ceilings in the smaller buildings are 15 feet high.Doors.
Thick oak doors secure most of the building. Locked doors require a successful DC 15 Dexterity check using proficiency in thieves’ tools to unlock or a DC 21 Strength check to break open. Otherwise, the doors have AC 17, 25 hit points (damage threshold 5), and immunity to poison and psychic damage.Windows.
Gorgeous stained glass windows depicting the deeds of various saints and demi-gods decorate most of the main building, casting red, gold, and orange light within. These lead-lined windows have AC 13, 10 hit points, vulnerability to bludgeoning damage, and immunity to poison and psychic damage.Illumination.
Bright continual flames set into torches scones burn throughout the cathedral day and night. Still, there are many dark recesses in which terrible creatures might hide.Encounters
10 Years into the Past
Any character that is sent into the past finds themselves in a ruin of a different temple. Within this temple, they will find a computer and a doctor who is from another place. He is experimenting on time here. He will give the players vague instructions about writing themselves notes and clues for their future benefit. He will make mention of them having been here before and coming again. After he has a brief interaction with them, he will do something at his computer that sends them back to their time.10 Years into the Future
Any character that is sent into the future will find themselves in the same temple, but now it is empty. When they explore, they will find themselves again in the company of the Doctor who is still conducting research on time. He will give them vague warnings about someone in their group dying and those that don't move being the most dangerous. He will encourage the character to help themselves with clues and notes, then he will send them back into their proper time.
Parent Plot


Comments
Author's Notes