Last update: May 19th, 2026
Welcome to World Anvil, the home of your new world! In this get-started series of lessons (and videos!) you’ll learn everything you need to know to get started on World Anvil.
Pro tip: You can access the whole series from the Get Started widget at the bottom of your World Anvil interface!
On World Anvil, your world = your setting
A World Anvil world is a setting, no matter the size! Your world setting might be as small as a city, or as big as the Marvel Cinematic Universe with hundreds of solar systems, planes, and realities. Whatever the size: if it’s one project or setting, it’s ONE world on World Anvil.
What is World Anvil, in a nutshell?
Using the World Anvil worldbuilding tools, you can create and describe everything in your world setting. Write Articles for your characters, places, items, organizations, spells, and so on. Create Interactive Maps to track locations, and build Timelines to record your world’s history. You can also add Secrets to your world, track your Family Trees, and more...
Your World Anvil world also contains Manuscripts—a novel-writing software allowing you to write stories and novels in your setting. And in the RPG Campaign Manager you can build and manage the RPG campaigns you plan and play in your setting (and invite your players to craft their characters, too!).
Both Manuscripts and RPG Campaigns “live” in your world, and connect to your articles, maps, timelines etc.
Assignment 1: Create your first Article
Let’s start our journey by creating a Building, let’s say a Tavern (or a Night club)!
- At the bottom right of the interface, click the Create button. A modal window will open with lots of options. Select the “Building” option.
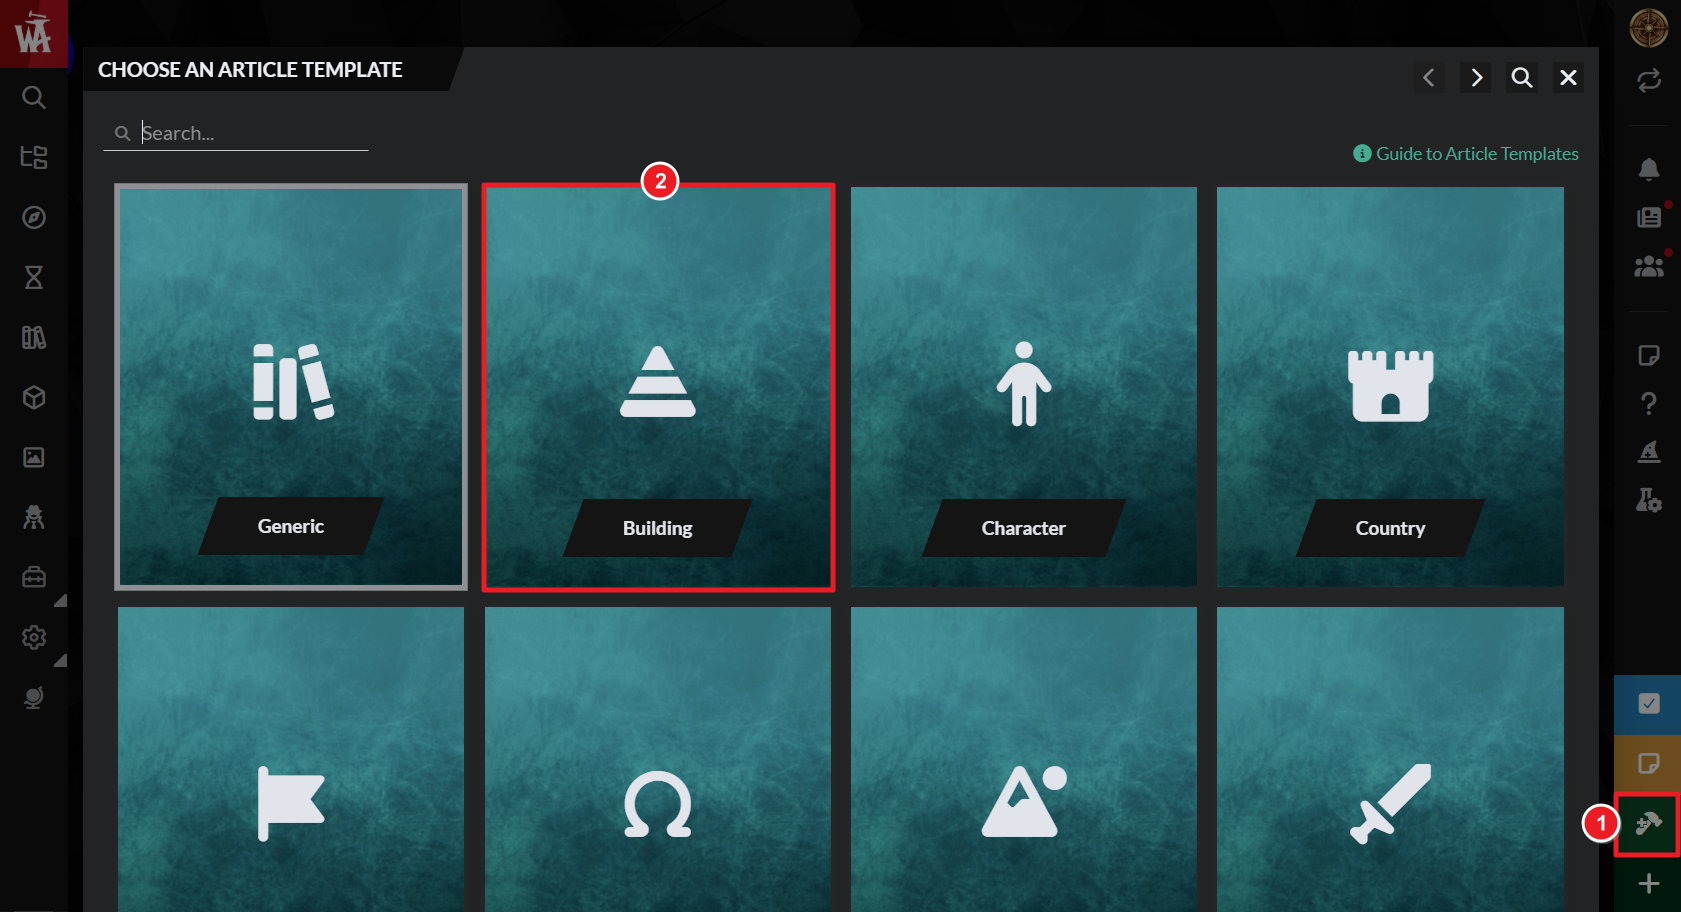
- This will open a new pop-up: it's your article! Add a title, and your building article will automatically save: a green tick will appear at the bottom left, and you’ll be able to see your “last saved” time and date at the bottom of the window.
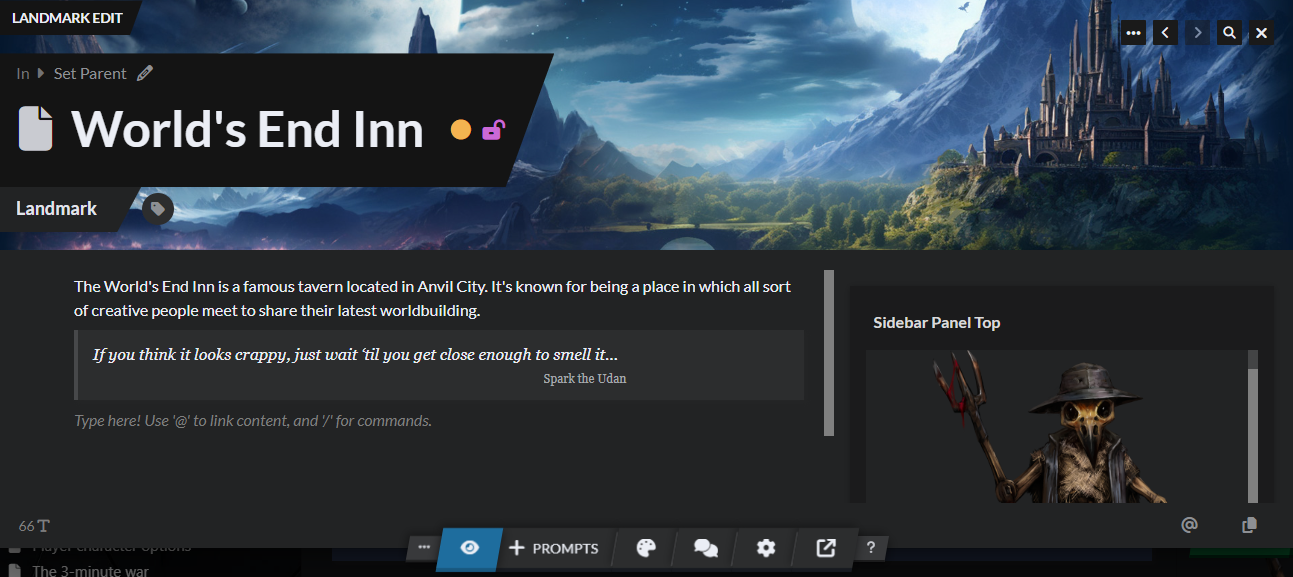
- Directly under the title, where it says “Enter text or type ‘/’ for commands”, write about your new building! You can write whatever you like here, but an introduction or summary is a good way to start an article. If in doubt, think: Who, What, Where, Why or When. For a Tavern that might be: Who owns it (and goes there), What is it like, Where is it, Why is it popular, and When did it open?
Formatting your article and using the / “Slash” menu
Now you’ve written some text describing your new building, let’s talk about formatting your article!
Highlight your text to format it
To format your article’s text, just highlight it. As well as basic formatting options like bold and italic, this formatting menu enriches your text with colors, dice roll buttons, anchor links and more. Mouse over the buttons of the formatting menu to learn what they do, and experiment with different formatting options!

Introducing the Slash Menu
For even more commands, type / (“forward slash”) to bring up the Slash Menu.
Using the Slash Menu, you can add headers, tables, line breaks, quotations, spoilers, and more to your articles. You can also embed your World Anvil content: your maps, family trees, diplomacy webs, and everything else (once you’ve created it!)
Some command options have keyboard shortcuts shown on the menu: for example, 3 hyphens create a line break; a # symbol creates a Title Header. If you know Markdown, these will already be familiar to you.
Assignment 2: exploring the Slash menu
- In your Building article, type “/” to bring up the Slash Menu.
- Take some time to browse through the options and see what’s possible!
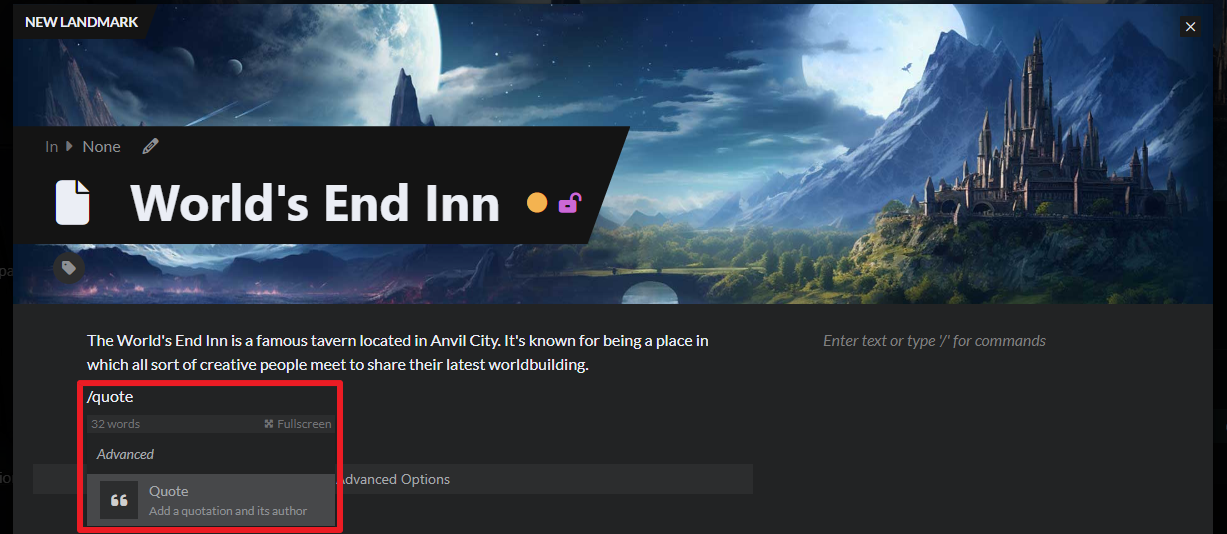
- Now select “Quote” from the menu. A new block will appear in your article.
- Click on the quote box, and write a first-person opinion of your tavern or nightclub! For example, “If you think it looks crappy, just wait ‘til you get close enough to smell it…” If you want to add an author, click on Author of Quote, and write the name of who’s speaking.
- Mouse over the quote box, and you’ll see a drag handle on the left—6 dots arranged as on a die. You can click and drag to rearrange the quotation where you want it. Quotes are great for breaking up long texts, or setting the tone at the opening of an article.
Pro-tip: When you open the Slash Menu, you can type your command—e.g. “/line” or “/quote”—to filter the options and quickly find what you want from the menu!
Adding images to your articles
Now your article text is taking shape, let’s talk about adding pictures!
Adding new images
To add a new image to your article, simply drag and drop the image file from your computer into the text field.
Pro-tip: When you add an image, World Anvil automatically uploads that image to your world. You can reference all the images in your world by clicking “ Images” on the left side bar of the main interface.
Adding existing images
If you’ve already used an image somewhere else in your world, you don’t need to upload it again!
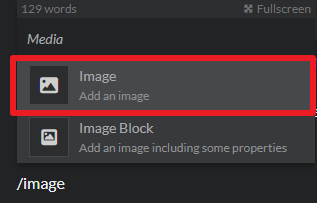
- Type / to bring up the Slash Menu (or /image to filter directly to images) and select “Image”.
- Click “By Title”, and start writing the title. Images matching your title search will appear in the pop up.
- Click your chosen image to add it to your article.
Pro-tip: If you’re using World Anvil on mobile, you should also upload new images this way! Select /image from the slash menu, tap the “Upload” tab, then “Choose file from device”.
Changing the article cover
Behind the title of your article is a default picture, which you can change! Mouse over the image and you’ll see a small text at the bottom right with an image icon. Simply click the image icon then select a new image to upload.
Assignment 3: Add an image to your Building article
- Choose an image for your tavern or nightclub! It can be a picture of the building, the sign, the owner, a drink purchased there, or anything else!
- On computer: Drag and drop an image into your text field!
- On mobile: type /image, tap the “Upload” tab, then “Choose file from device”.
- Like with your quote, use the drag handle (6 dots) to reposition the image in your article.
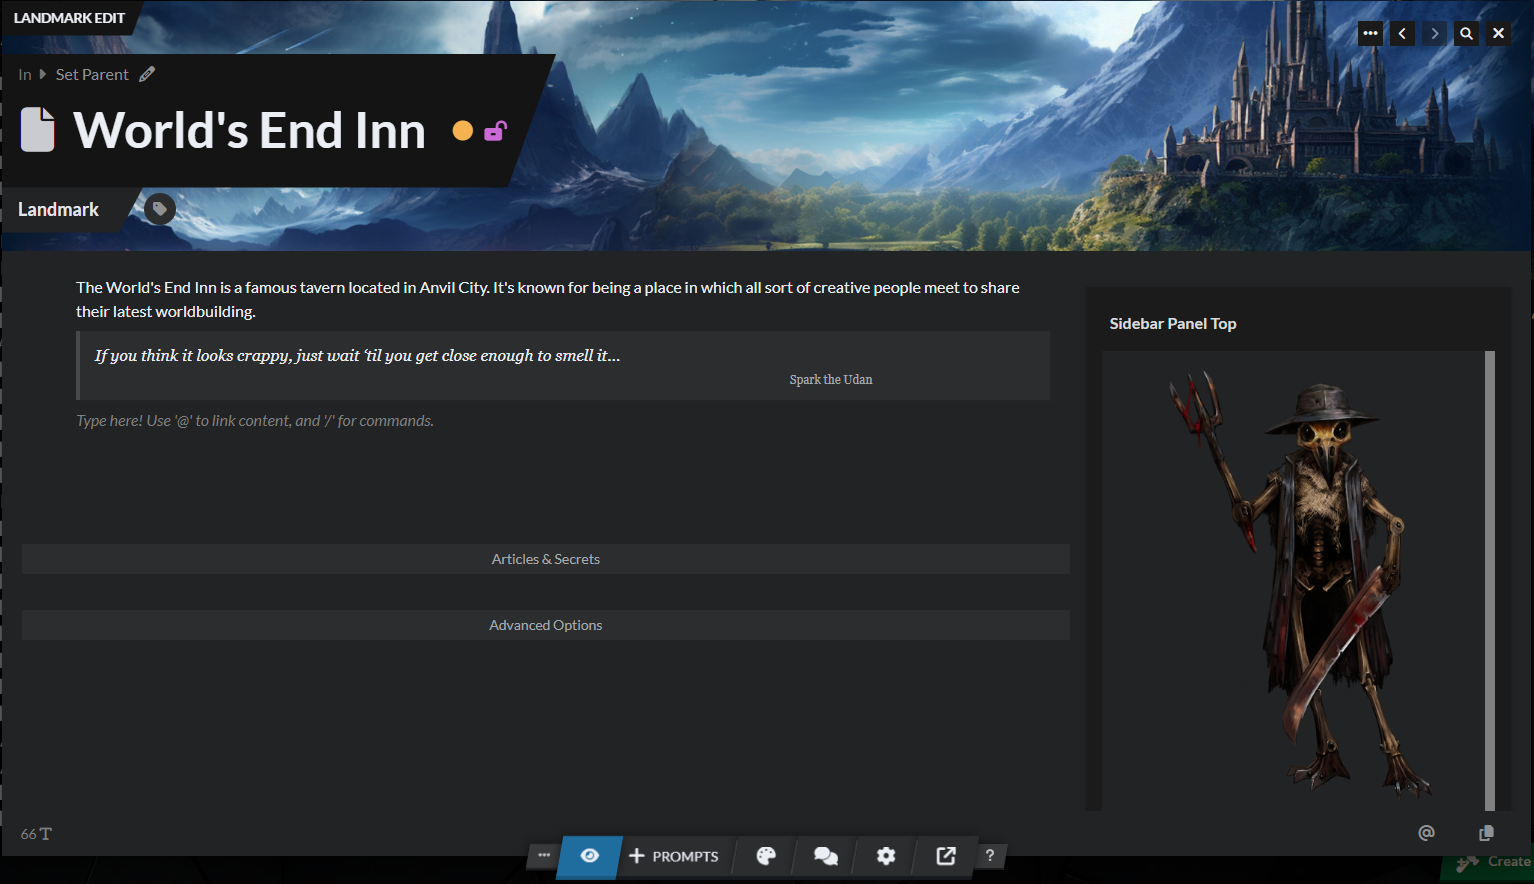
You’ve created your first article, complete with images and formatting—great job!
Article templates: the basics
For your first article, you used a Building template. For your next task, you’ll create an Assassin’s Guild using the Organization template. But what does that really mean?
Article templates on World Anvil contain prompts tailored to the topic of the template. These will help you to better describe your subject and create a more interconnected world! Click the "+ Prompt" button in the edit toolbar at the bottom to get started:

Many templates also have extra tools that create a deeper and more connected world setting. For example, in the Organization template you can define diplomatic relations between different organizations. Then, you can display them as an interactive diplomacy web later. Similarly, the Language template contains a dictionary, and the Character template a relationship system!
It’s important to choose the right template, so your article has the prompts, tools and connections you need! In the Article Template picker (which pops up when you click Create) you can mouse over each template to learn what it’s for.
Pro-tip: There’s a detailed Guide to Article Templates linked at the top right of the Article Template picker (and also linked here!).
Assignment 4: Create your Second Article
Now let’s create your second article—you should create an Assassin’s Guild to follow along with the lesson!
- To create a new article, close the Building article using the X in the top right corner (or tapping Esc), then click the Create button at the bottom right of the interface again.
- A guild is an Organization, so click the Organization template from the list.
- As before, add a title and your article will autosave.
Linking articles to other articles
Let’s talk about linking articles together—World Anvil is designed for just that!
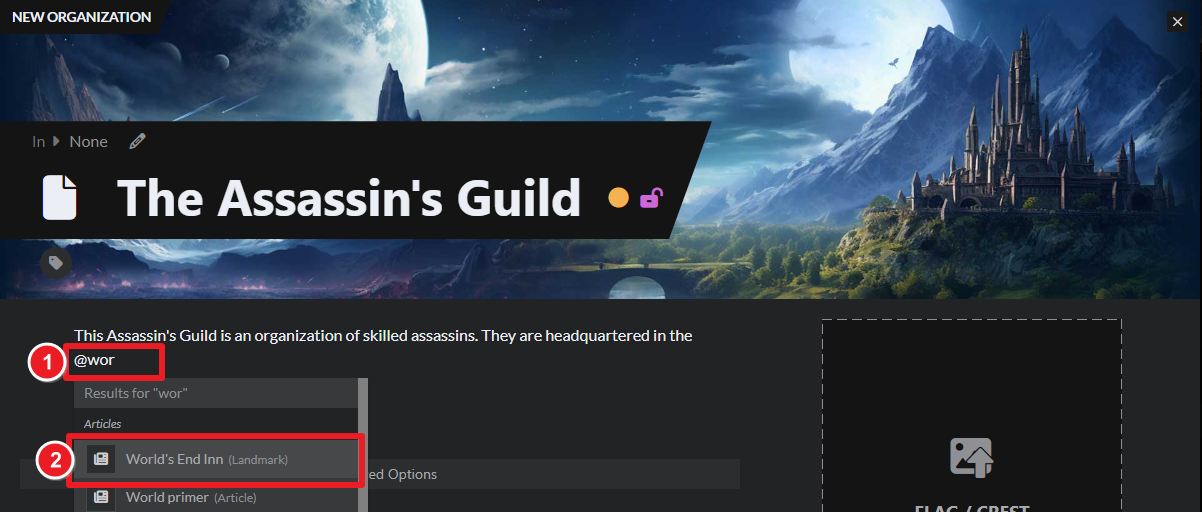
To link one article in another, type @, then the first three letters of your article’s title—articles matching your search will appear below. Click your chosen to create the link.
If you want to adjust the name presented in a link, mouse over the link and click the pencil icon that appears. From the pop-up you can adjust the title, or even remove the link from your text.
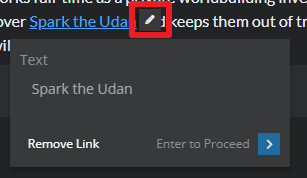
This is useful if your article title doesn’t fit smoothly into your prose: for example, you just want the anchor text to say “Crown and Plough”, instead of “The Crown and Plough Tavern”. This won’t change the title of your linked article.
Pro-tip: World Anvil also has an Autolinker—this “reads” through your article’s text and finds words that might be the titles of articles you could link to. To start running the Autolinker, type /autolinker or select the option from the Slash Menu. Check the guide to the autolinker for more information!
Assignment 5: Link your Building into your Organization
It’s time to try out linking for yourself!
- Think of a reason to mention your Tavern or Night Club in your Assassin’s Guild article. It might be the front for their secret lair, an asset they control, or a favourite hang out.
- Now, type @ then then first three letters of your Building title, and select it. You’ve now linked your articles together!
Private vs. Public
Articles (and all your other content on World Anvil) can be public or private.
Public = your readers or RPG players will be able to find it online
Private = by default, this is only visible to you
Public content is great for sharing information with your players and readers, and growing the following of your setting.
By default, only you can see your Private content. That’s true of articles, timelines, maps, and everything else on World Anvil. However, you can give individuals access to content that’s private from everyone else, using Subscriber Groups. There’s more information about this in a later lesson.
Next to the title of your article, you’ll see a colored circle and a padlock. Click there to reveal the Published/Draft and Public/Private slider, then click the sliders to adjust your article’s state.
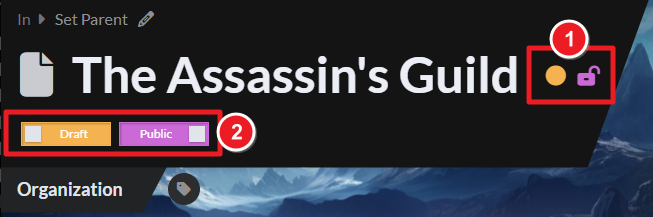
Published vs Draft
As well as public and private, articles can be Published or Draft.
Draft: only you can see this. Use for unfinished articles.
Published: everyone “with access” can see this.
To make things simpler for beginners, articles of free users always start as Published, but you can make them Draft using the slider.
Pro-tip: Your articles don’t need to be long before you Publish them. And they can be written in bullet points, if that’s how you think! The most important thing is to capture your ideas as you worldbuild.
Searching for your Articles
Now you know all about making articles let’s talk about how to find your articles quickly using Search!
To open the Search window, type Ctrl+K or click the Search icon at the top of the left menu bar.
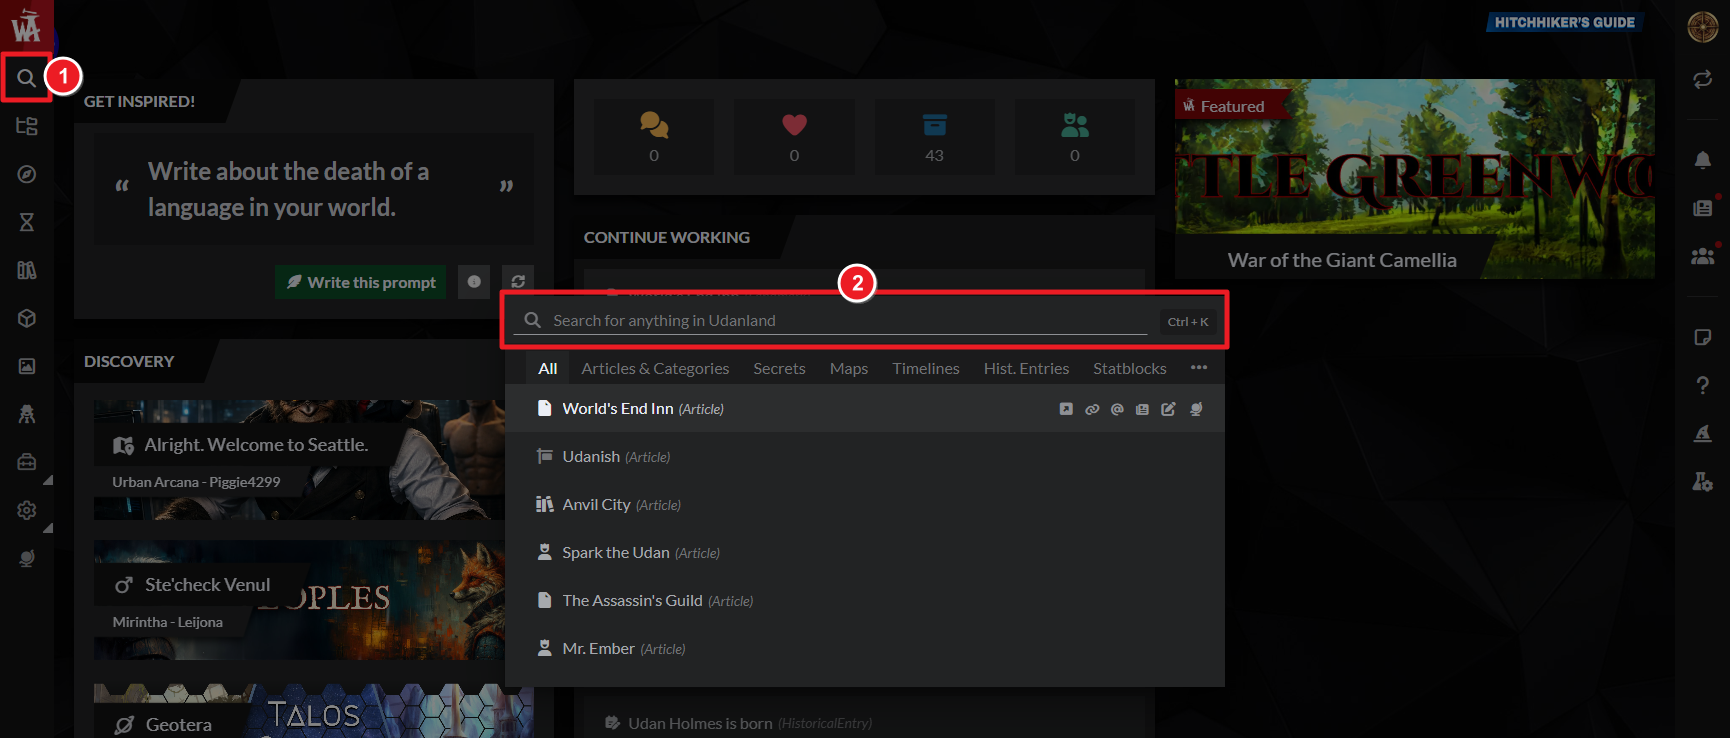
In the Search window, you can:
- Browse your most recently edited content: before you type anything in the search field, it will display the last content you edited.
- Search by name for your articles (and all other World Anvil content—your maps, timelines, statblocks, notes, etc.)
- Click a title to open your content in edit, or mouse over for more options.
Articles & World Manager—an overview of your articles
For an overview of all your articles, click Articles & World Manager on the left menu bar. The Articles and Categories interface is where you can manage all your articles, and also organize them into Categories.
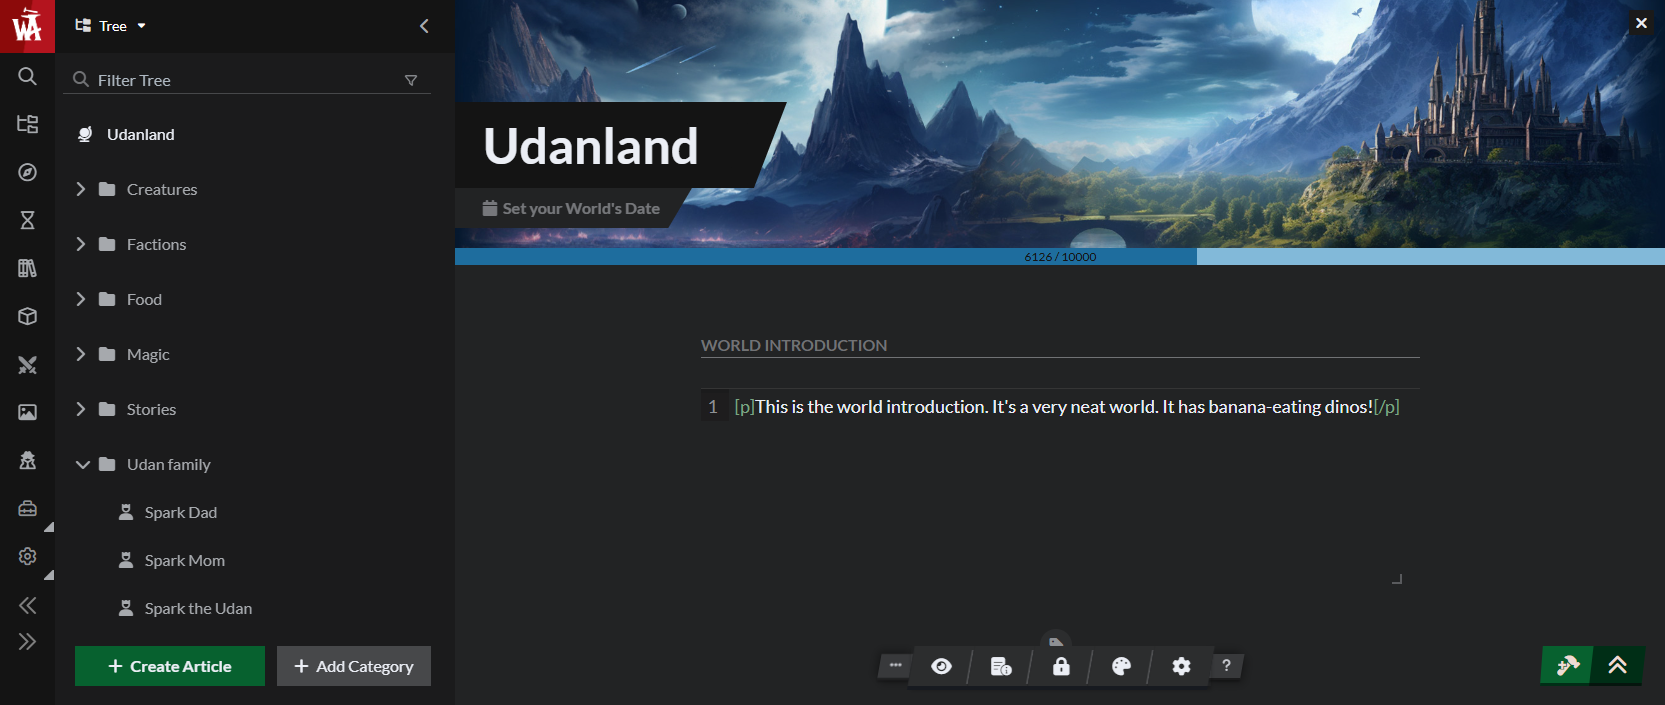
By default, the main area of the interface lets you edit the world homepage, with a toolbar at the bottom to edit world settings. If you click on any of the categories or articles on the left, you'll be able to edit them in the main area.
When you open this interface, articles appear sorted in their respectives categories. To see all of your articles regardless of category, click on the filter icon at the top and select "List".
Categories: what are they, and how to use them?
Categories are like folders for your articles. Once you have several articles, you should organize them using Categories! This will make it easier for you—and your readers—to navigate your world.
What categories should you add?
Categories help you group together what’s important in your world—and that’s different for different kinds of worlds! Some good starting categories might be:
- “People”, “POV Characters”, or “NPCs”
- “Monsters”, “Animals”, or “Bestiary”
- “Atlas” or "Geography"
- “Armory” or “Weapons & Armor”
- “Magic” or “Spells”
- “Technology” or “Cybertech”
- “Religion” or “Deities”
- “Organizations & Factions”
You can find more tips and ideas for grouping your categories here.
Assignment 6: Create some Categories and order them!
- On the left of the Articles & World Manager, click "Add Category" at the bottom.
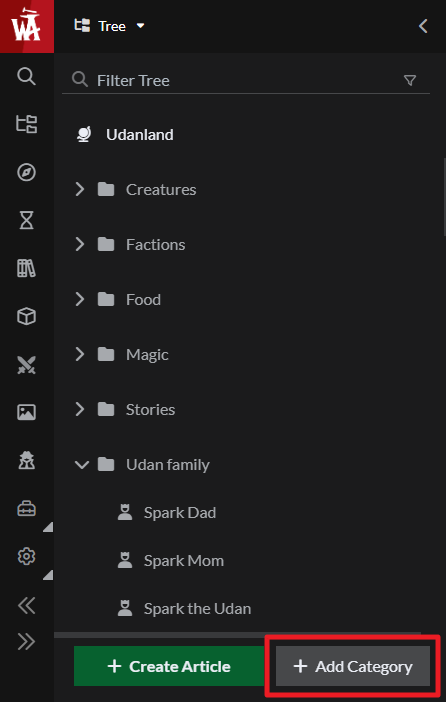
- Give the category a name and click the green plus button to create it.
- Follow this process 3-4 times to create your categories!
- Now click and drag your categories around to reorder them, or nest a category beneath another category.
Note: In order to drag and drop, you need to click and hold the category for a split second before dragging it. - Finally, drag your articles into your categories to organize them!
You can click on a category to see its contents and edit its details.
Assignment 7: Write 8 more articles in your setting!
You’re almost done with Lesson 1 of the Get Started Guide (it’s the longest lesson, by the way—the others are quite a lot shorter!). The last thing to do is create eight more articles, so you have a total of 10 articles in your world! That’ll check off the first step of the Get Started Wizard.
Not sure what to write about? How about:
- Some Character articles about your Tavern/Nightclub owner and regular patrons, your Assassins Guild members, or your heroes.
- A Geography article about the region you’ve been writing about or a Settlement article about the city your tavern is in.
- An Organization article about the Country you’re writing about (yes, Countries, Empires, and Kingdoms are organizations!)
- A Natural Law article about the magic in your world or other strange powers.
- An Organization article about the pantheon of your world, or Character articles about each of your major gods.
Remember to link together your articles—use @ and then the title of your articles to link them! Then drag them into your categories to organize them!
Getting more help with World Anvil
Once you’ve finished this lesson, continue with the Get Started Wizard for the next steps on using the UI, Timelines, Maps, and other important topics. This series will make your first experience with World Anvil easier and more productive, so please do follow along!
Find the next lesson here, or access the full course using the Get Started Wizard at the bottom right of your World Anvil interface.
How to get more help on your journey!
And if you need more help with World Anvil, there are a lot of places to get it!
If you’re already feeling confident with World Anvil, use one of our workflows (Writers | Game Masters) to walk you through the next steps of building your world setting at a quicker pace.
Or jump in and explore the features you’re excited about! Each feature has a detailed guide linked on its interface. You can also find the Learn section—our full documentation—by clicking Learn at the top of the interface.
Once again, welcome to World Anvil! Now, as we say in our community: grab your hammer, and go worldbuild!