Dungeon Crawl: Rubble and Ruin
There is something hidden in this ruin...
"You arrive through the dense jungle into a small clearing. Enclosed by verdant, large trees, you spot the ruin of your search. An ancient entrance leads into the heart of a grassy mound before you. The path is set before you as you gaze through the open, dim doorway. What do you do?"
The Entrance
Enter the 1st Room"As you enter into the first room of the ruin, you're instantly greeted with its dry air. You see ancient, dirt-covered tapestries that have fallen to the floor beneath carvings of yore. On your right, on the Eastern wall, lies a large doorway leading into the second room of the ruin."
Tapestry. Only thing you are able to discern from these is that the original tapestry was dark purple in colour.
Carvings.You can tell that this place was intended to be a meeting place between two different cultures.
"You enter the second room. This one slightly smaller than the first. Stone benches surround the walls and you make out the familiar carvings again. Here, they are more preserved than the ones in the lobby. On the same wall where you entered lies a large doorway to the third room of the ruin."
Carvings. Images of proud centaur are made more clear on the wall. On their right side, a rushing river. On their left, are the snake-men known as Yuan-Ti. Further investigating, you find nothing else of interest in the room.
"You arrive to the last room of the ruin. It seems to be a laboratory with an elaborate pedestal, upon which a small bowl has been etched. On the right side of the bowl, on the Southern wall, you see the largest engraving yet. The carving presents a large yuan-ti shaking hands with a larger centaur. Behind each of them stand their own people, proud and wearing their seperate colours."
The Alchemists Bowl. Any character with proficiency in alchemists supplies can use this bowl to safely create various acids and poisons, without the risk of ruining the altar. Outside of that, as you glance and investigate the altar you notice a small spherical form at the bottom of the bowl. The form of the etching resembles an eye, and would be at the deepest part of the bowl, where liquids usually gathers first.
Carvings. As you glance at the carving, you notice a detail you didn't spot on your first sighting. It seems like tiny serpents are crawling forward from the hand of the yuan-ti, and seem to be nearly molding together with the hand of the centaur. The etchings are beautifully detailed up to the slitted eyes of the yuan-ti and the determined, round eyes of the centaur.
The Underground Ruins
"Walking through the secret door, you find yourself in a dark, downwards sloping hallway reminiscent of a ramp. After opening the door a moment passes, before the darkness is illuminated by coal braziers set into nooks on both sides of the hall between every thirty feet. The light of the braziers reveals a decorated golden snake covering the central floor tiles and descending down, further into the ruins with every slope the hallway takes."
Golden Snake. As you inspect the golden snake, you can see its beautiful golden curves are part of an ancient, mosaic-like pattern on the ground. It seems like the rest of the pattern has worn off with time. If you wished to investigate the snake further, you could learn something from those who crafted it.
Braziers. The braziers emit strong heat from them, enough to bring warmth to the underground passage. As you approach them and try to discern means of a mechanism behind them, you're left to believe that if there is indeed a mechanism, it is arcane in nature. Trap is Sprung!
If the player declare to continue down the hallway without anything noteworthy or none of them check for traps (or fail horribly at checking them), assume that they will step on the decorated snake as it covers most of the central ground in the hall. Hallway from the tip of the serpents tail to the secret door is blocked by a stone ramp that has crashed down to reveal a boulder. Roll for initiative. The boulder begins its movement ten feet behind of the player characters and moves at initiative count 15 and 5 with its only ability being to move its speed of 30 feet down the hallway.
Crunch! If the boulder moves through or shares a space with a character, ask for that character to roll a DC 16 Dexterity Saving Throw. They take 3d6 piercing and 3d6 bludgeoning damage, or half upon a success and end up prone. Let your players be imaginative in their opportunities to evade the boulder!
Where did it go? The boulder ends up crashed, digging itself partly inside of the pillars in front of the entrance to the underground ruins. Characters can easily duck beneath the boulder, but this crash has drawn in the attention of the ruins guardian.
"You enter a wide hallway, decorated by four pillars and an ancient, destroyed doorway allowing you free pass. The dark interior is decorated by a wide cornice near the fifteen foot high roof of the temple. You come to an intersection, where you see a singular, ancient door leading forward and heavy double doors to your right."Pillars. The four pillars depict different figures. One of them presents a hooded humanoid holding a twisted dagger, seeping some sort of liquid. The second is filled with gargantuan scales that twist and turn throughout the whole pillar, until near the end you can see a monstrous serpentine head glaring down at you. On the third, a man whose arms have been completely taken over or even replaced by swarms of vipers and snakes. The fourth pillars surface seems rough, almost like something was etched out of it violently. It makes you wonder who this fourth figure could've been... or what?
Doors. There's a single door leading south to room 6. Old, wooden and cracked it can be easily taken down by a successful DC 12 Athletics check, or lockpicked with a similar DC. The door is slightly unhinged and offers tiny spaces to look through to see the prison cells beyond. The strong double doors leading west depict two yuan-ti clad in light armor and posing in a salute. The door can be easily pushed open to room 7. Aezt'ocan, the Guardian. If the players activated the trap earlier, Aezt'tocan (see statblocks) is spying on them above in the cornices of the room. For now, the curious guardian wishes to know how large of a party it is dealing with. A cunning creature, it will continue by using the elements of the upcoming dungeon against the characters. If the characters explore the cornices through a familiar or climb up there, Aezt'ocan will use his daily power of greater invisibility to avoid attention.
If the characters have not triggered the trap, consult the table below to determine where Aezt'ocan is and what he is doing upon their arrival.
| d4 | Room | Activity |
|---|---|---|
| 1 | 15 | Aezt'ocan is passing the southern pass from room 17 to room 16. Any light sources alert the guardian to follow the intruders in stealth. |
| 2 | 16 | Aezt'ocan is resting. While it is not necessary for the creature to sleep, it tucks itself beneath the mattresses to seek comfort. While resting, Aezt'ocan has disadvantage on perception checks, being alerted only by bright light or by loud sounds. |
| 3 | 17 | Aezt'ocan is lounging on the surrounding cornices, looking longingly at the pillar in middle of the room and the tale told in it. |
| 4 | 18 | Aezt'ocan is fiddling with his mage hand at some of the objects inside of the room. He has gone through these hundreds of times already. |
"As you manage through the ancient, weakened door, you arrive to a tight hallway. Spikes. That is the first thing you see as you look at six cells, with three to your left and to your right. The cruel bars have been fitted to hold an averagely larde creatures inside and they are all fitted with spikes. Smaller protrusions pointed towards the hallway, with larger tips on the other side of the cells pointed inwards. Dust covers the ancient floors of the room."
Cells As you explore the cells further, you spot lighter tanned rocks at the far south-eastern cell. When you approach, the sight of neatly picked, large bones reveal themself. Sand obscures the body that is that of a centaur. The cruel spikes make it difficult to force the celldoors open from either side, requiring a successful DC 25 Athletics check. Lockpicking these locks is slightly easier than breaking them at a DC of 20. The ancient jailers knew what they were doing. Is a party member a centaur?
Skeleton Beneath layers of dust and sand next to the skeleton lie two ancient gauntlets with bloodstone gems as decoraration. As the gauntlets are moved, the leather flakes off in small patches as only the bloodstone chunks remain. The two cut bloodstone pieces are worth 25gp individually.
Enter the 7th Room
"Pushing open the sturdy stone doors, you're greeted by a round room with a cornice at 10 foot height circling around it. On middle of the room there's a tall standing pillar, not only holding the weight of the ceiling but as well having beautiful carvings upon it. On your left side, you see a pair of stone doors as well as on the other end of the room."Aezt'ocan. If Aezt'ocan is in the room or is lured here, it will use its mage hand to trigger a trap as many characters as possible are within 10 feet of the pillar. Most likely as they're reading or investigating it. After weakening the party as a whole, Aezt'ocan attacks them, focusing on those in most vulnerable state.
Trap. As you have gathered around the pillar, a large crash is heard from the roof of the room when three enormous blades descend along the grooves of the pillar! Every character within 10 feet of the pillar rolls a DC 14 Dexterity Saving throw against 2d10 slashing damage. Upon a success, the damage is halved. It takes one full round for the blades to retract from the floor and to return to the ceiling after which the trap can be used again. The way to activate the trap is through a stone pressure plate in the northern cornices of the room, described in area 17. Aezt'ocan uses his mage hand to activate this trap.
Locked Doors. The doors leading southwards to the 13th room are locked. The key can be found on an corpse in area 16. Otherwise accessable, the door can be lockpicked with a successful DC 15 thieves' tools check, or forced open with a similarly difficult athletics check.
Pillar. The pillar hides much of the ruins lore. Its purpose and the nature of experiments performed here, as well as a current-hidden-room revealed on the map (Area 14). Any character who understands Abyssal can read the two names inscribed to the altar. Name carved next to the yuan-ti reads "Qrrash" while the carving next to the drake reads "Aezt'ocan".
The Living Quarters
"You arrive to a dusty hallway. To your right, stand two doors. To your left, a single door. Directly forward you see another door. Where do you go from here?"Secret Door. A secret door, acting as an emergency exit from the petrifying chambers lies on the left side of the room. A character with a Perception check over DC 16 spots the metallic door. The door is unoperable from this side and acts as a vault door, made of large sheets of copper.
"A former larder lies in front of you, nothing of worth remains."
"A former kitchen lies in front of you, apart from deducting that the ruin did not house many persons but rather a small team, nothing else of worth remains."
"You open up another door, entering a small study. A lone desk stands at the far wall of the room and to your right, bookcases with crumbling booklets filling its space."Bookcase. As you approach the bookcase, you feel as though your presence alone would be enough to weaken the ancient tomes. If a character decides to shuffle through the books, looking for anything useful, have them roll DC12 Sleight of Hand check, representing how carefully they must look through the tomes. Upon a success, a book is discovered with a simplified cipher hidden on the inner side of the cover. A character who spends ten minutes studying the cipher will understand the remnants of a journal found in area 13 as well as text found on pillars in area 7.
"You arrive to the bunks and see the barely-standing, rotten frames of three beds in front of you. On the far corner of the room, a partially broken chest stands alone."Beds. Small colonies of bedmites and moths have left these beds in ruins. Chest. Upon first inspection, the chest appears empty. However, a character with passive perception over 13 will instantly notice that the inside of the chest does not match the shape outside. A character prying the bottom boards off (or simply breaking them) will reveal a leathery scroll case, inside of which there's a spell scroll of Hold Person.
The Laboratory
"You arrive to a room, seemingly standing through much of the test of time surprisingly well. Walls to your left and right are covered in bookshelves. On the opposite wall, you see a scribes station with a desk and an open tome on top of it. Small jars and ingredients now-molded and ancient stand behind the tome. On corners, sharing the wall with your entrance you see two closed chests."Tome Any character who understands Abyssal, or has acquired the cipher from area 11 can translate the last barely-legible text from the last page of the tome. Trying to flip the pages or lift the tome will lead to the destruction of the pages and their contents, as is immediately noticeable to anyone with their passive investigation score over 13.
Alchemical Substances & Chests On desk, the players can discover a minor protective salve that has long since gone past its expiration date. However, a character with proficiency in Alchemist's supplies can determine the reagents of the salve given enough time. The chests contain three vials of acid as well as three vials of alchemist's fire.
Bookshelves. A character investigating the bookshelf on the right discovers a hidden door behind the bookcase. This door leads to area 14. The door has a large symbol of a nesting serpent keeping it close. On the doors center, there's a small surface of red glass. Performing an offering of blood over the glass will open the door automatically, with the circular surface rolling out of sight inside of the right wall.
"You view a misty room, the mist begins pouring out as soon as the circular door opens. Behind the mist you see a large figure, frozen with time. Soon, an echo of granite crackles from the room as the large figure begins to slowly maneuver. From what you can tell, you see four muscular humanoid arms over a centaur-like body. Attached to its head, tight so that it itself may not be able to function properly, is a helmet resembling a bronze cobras hood. As its lower hands reach to its back to pull over a cruel glaive, its lower hands flash out two schimitars. With a roar of agony and madness, Zachan the First has awoken from his slumber and is charging at you."
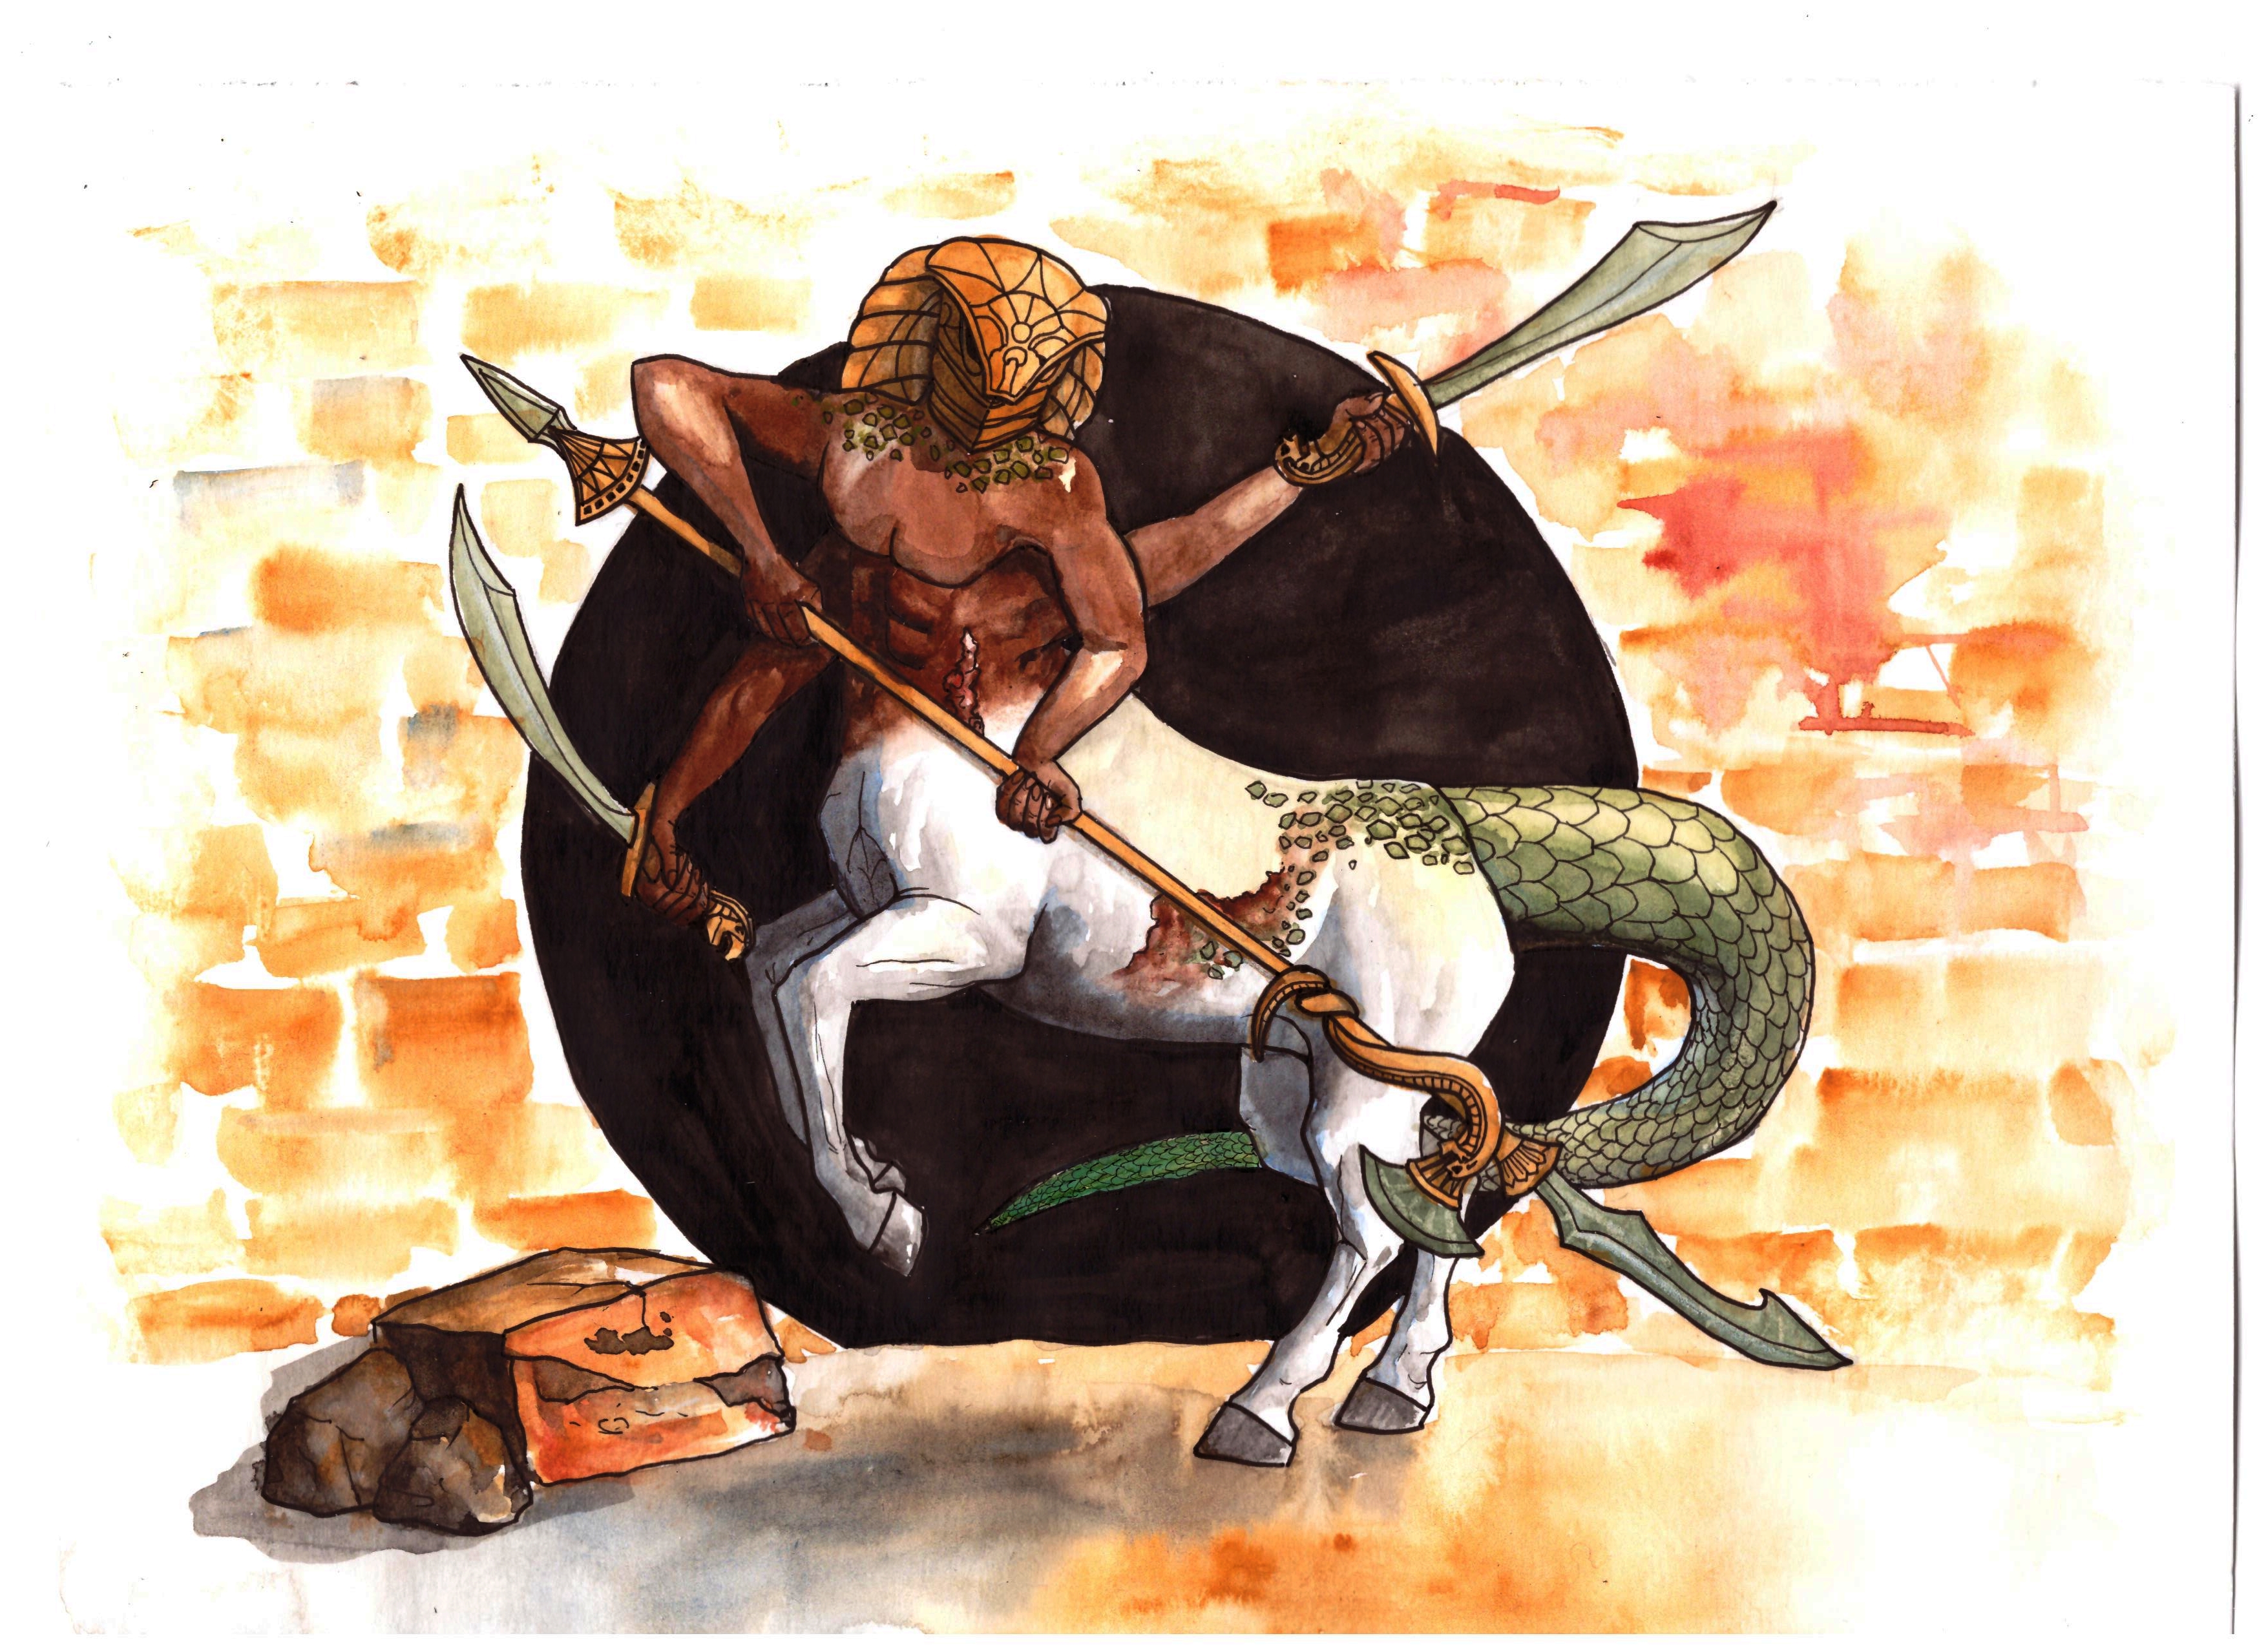
Zachan, the First. Zachan is a first attempt at creating a yuan-ti mutation from their centaur slaves. However, Zachan is well beyond the point of madness and cannot be calmed down by any means. This fight should be a tough one, but managable with Zachans curse. As Zachan uses his "bite" attack for the first time, the helmet is torn nearly asunder as Zachan's neck grows to resemble the body of a snake.
Glaive of Malignant Blood Weapon wielded by Zachan is able to summon sanguine serpents from the blood of those he strikes. Further detail is found from Zachan's statblock. This glaive is small for Zachan to use, so it should be perfect for a character to pick up after Zachan's defeat. The weapon deals only 1d10 damage on a medium creature.
Miasma. Any character beginning its turn within the first minute of the doors opening inside of area 14 must roll 1d6 at the beginning of their turn, or they become petrified until the end of their next turn.
Lair of the Guardian
"You discover small platforms over the cornices, and tunnels in the walls clearly designed for a lean creature to move through. Additionally, you spot a room unaccessable from lower levels above the southern room of the hallway."
"As you duck your way to the dark interior, covering the other room below, you find yourself in a hidden den. There are piles and piles of purple carpets and curtains that have been formed to resemble a nest or a bed, and a strange collection of stones placed in a nearly ritualistic manner over a humanoid corpse."The Nest. From the nest of Aezt'ocan characters can discover ancient silks and fabrics, torn and used by the strange beast as a nest. Unfortunatedly, without the hands of someone proficient in tailor's tools and possibly some magical cleaning and a lot of time, these silks are worthless.
The Carcass. Surrounded by stones, the skeleton of a serpent-like humanoid lies on the floor. Clearly placed here to look like it were at peace, there's a key covered beneath its skeletal hands. This is the key to area 13.
"You walk on the precipice, looking 10 feet down at the circular room with a pillar standing in middle of it. You see a tunnel leading further south from the cornices."Trap Mechanism A character who investigates the area, or surveys the north section of the cornice finds a stone slightly protruded from the wall, with the engraving of a hand on top of the stone. Pressing this will trigger the trap in room 7.
"You arrive to an advantage point over a room. The room below looks like a laboratory as you stand on a cornice looking down. You see a tunnel leading north above this room."
4
Level
3
"Read-aloud text for the Gamemaster"Suggestions
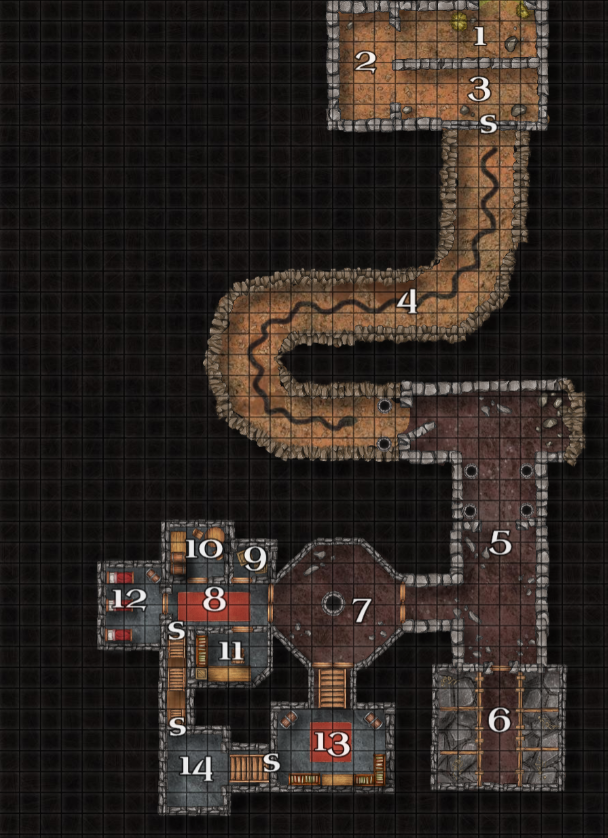
Bolded Areas. Important areas of the dungeon.
Statblocks
Aezt'ocan, the Last Guardian
Zachan, the First
Remove these ads. Join the Worldbuilders Guild








Thanks for jumping in the fire with me! Can't wait to see you develop this further :D
Thank you for the kind words! Sadly, life is busy and I haven't had the proper time to upgrade this. Good news is that my player party ran through this entire dungeon yesterday so I'll know what I'll write beforehand with a few fixes, but still need to find a silent moment to just sit down and write it down!